


2.8 INSTALLATION
Make a backup copy of the reverse side of the MultiRam disk, the Utility side of
the disk containing a RAM test program. Use COPYA or the ProDOS Filer contained
on the Utility side of the MultiRam disk to make the copy. Refer to your Apple
manual for information on the copy process if you are unfamiliar with disk
copying.
When you have finished making the backup copy, turn off your Apple and remove
all connectors from the back panel of the //c where it is now sitting. This
means you should remove the external power cable and any mouse, joystick, modem,
video cable. RF modulator, external disk drive, or printer if these devices are
connected.
Insert the backup copy of the MultiRam disk into the //c's internal disk drive.
Gently place the //c upside down (the keyboard facing down) on top of the soft
cloth at your work area.
Disassembly
Follow steps 1 to 9 to prepare the //c for insertion of the MultiRam C Card.
Before beginning disassembly of the //c case, touch a metal object to discharge
any static electricity from your body. This will prevent potential damage to
the RAM on the MultiRam C Card.
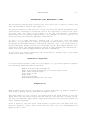
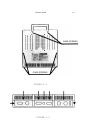
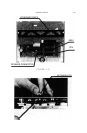
I. Remove the six screws identified in Figure 2.2 with a small/medium size
Phillips screwdriver. These are the screws at the outside edges of the
case. Do not remove the four inside screws; these hold the disk drive in
place.
The two screws at the rear of the case have a larger thread size than the
four screws at the front of the case. Separate the two larger back screws
from the others so that you will not try to insert them into the wrong
holes when reassembling the case.
The two screws at the aides of the case may not come fully out of their
holes for removal by hand. If so, turn the //c right side up (keyboard
facing up) and gently shake roe //c until these screws fall to the cloth
below the //c.
Safely store the screws aside.
2. Place the //c on the cloth, keyboard side up. with the back of the //c
facing you.
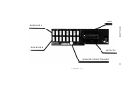
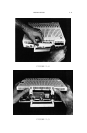
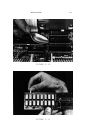
3. Remove the back panel. This is the flat plastic panel which identifies
the ports at the rear of the computer. The panel must be removed before
the top of the //c can come off.
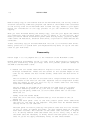
The back panel is held in place by nine plastic tabs that fit into notches
in the //c case. To remove the panel, you must remove seven of the tabs
from their notches. The location of the seven tabs are shown in Figure
2.3. If during removal some tabs break off, do nut worry. Only a few of
the seven tabs are necessary to firmly secure the back panel to the //c’s
case. If you do not apply unnecessary force, so tabs should break.