


Chapter 2. Hardware Setup
21
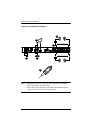
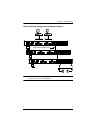
Cascading KH2508 / KH2516 Cat 5 KVM Switches
To cascade KH2508 / KH2516 Cat 5 KVM Switches, refer to the installation
diagram on page 22 and do the following:
Note: Before cascading additional KH2508 / KH2516, ensure that the
firmware version of the KH2508 / KH2516 to be installed matches that
of the first-level KH2508 / KH2516. If necessary, perform a firmware
upgrade on the cascaded switch first (see The Firmware Upgrade
Utility, page 57).
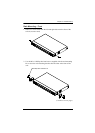
1. Plug a keyboard, mouse, and monitor into the Console 1 ports on the first-
level KH2508 / KH2516. Each port is marked with an identifying icon.
(Repeat step 1 for a second KVM console that you wish to connect.)
Note: The total distance between any KVM switch and any KVM adapter
cable in the installation (for example, between the first-level switch
and a thrid-level KVM adapter cable) cannot exceed 40 m (130
feet).
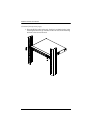
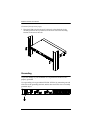
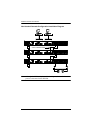
2. Use Cat 5e cable to connect up to 8/16 KVM ports on the first-level switch
to the cascade port(s) on the second-level switches in either a blocked or
non-blocked configuration (see diagrams on the following pages).
(Repeat step 2 for each third-level switch that you wish to cascade.)
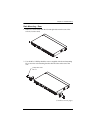
3. Plug the connectors on the KVM adapter cables into the computers you
wish to install and use Cat 5e cable to connect the KVM adapter cables to
any available KVM port.
4. Plug the provided power cable into the power socket on the first-level
KH2508 / KH2516; connect the power cable to an AC power source with
appropriate voltage for the KH2508 / KH2516, then turn it on.
5. Wait one minute, then repeat step 4 for each second-level KH2508 / KH2516.
6. Wait one minute, then repeat step 4 for each third-level KH2508 / KH2516.
7. Turn on the power to all the computers.