


19
USING YOUR SWITCH
18
USING YOUR SWITCH
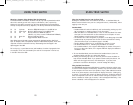
Now that you have connected your consoles and computers to your Switch, it is ready for use.
You can select connected computers by the direct-access port selectors, located on
the front panel of the Switch, hot key commands, or the On-Screen Display.
Note: For hot keys (e.g. up and down arrows) and AutoScan, the order of progression,
when switching from one computer to the next, is dictated by the order of the
computers in the list box, on the Main page of the OSD.
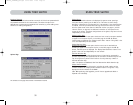
Selecting a Computer Using Direct-Access Port Selectors
The Switch has been designed to allow a 1x8 KVM Switch to access all of the ports on a
2x16 KVM Switch or KVM Expander (F1DE016C). Front-panel operations take place on the
release of a button. Front-panel operations are also different between daisy-chained
configurations and standalone configurations. In standalone configurations, each button
release immediately activates the feature selected. In daisy-chain configurations, the first
button release puts the console into Select Mode and subsequent button operations will
immediately activate the feature selected.
Note: It takes a moment for the video signal to refresh (depending on your monitor)
after switching computers.
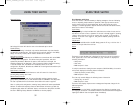
Standalone Configuration
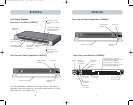
• The 7-segment LEDs will display the number of the port in focus for each console.
• One Port Selection LED will always be lit, corresponding to the port in focus and
the console.
• The Shift LED (labelled with an * on the front panel) indicates that ports 9–16
are selected (not applicable to this Switch in standalone mode).
• The Console LED will be lit, indicating that this Switch is a primary console Switch.
• BANK selection buttons will have no effect, since there is only one BANK in this
configuration.
1. Press the button corresponding to the port that you would like to select. When
you release the button, the Switch will beep, and switch the focus to the selected
port. If you don’t have permission to access the selected port, the Switch will
beep, switch focus away from the selected port, and a banner message will
display “Access Denied”.
2. If you press the AutoScan button, when you release the button, the Switch will
beep, and switch into AutoScan Mode.
Note: For a standalone Switch to function as described in this section, the BANK
address must be set to 00 and the “Daisy-chain this KVM” box must be cleared.
Otherwise, the Switch will function, but it will operate like a daisy-chained Switch.
Daisy-Chain Configuration
• The 7-segment display of a secondary Switch will always display its BANK
address. All other buttons and LEDs on secondary BANKs will be disabled.
Static Mode (Idle)
• The 7-segment LEDs will display the current BANK ID.
• The Port Selection and Shift LEDs will be off.
• The Console LED will be lit, indicating that this Switch is a console.
The Switch will go into Select Mode when you press and release any button on the
front panel of the console. The Port Selection LEDs will toggle from off to on, and
the 7-segment LEDs will toggle from indicating the BANK ID to indicating the BANK
in focus.
Select Mode
• Select Mode reverts to Static Mode after 5 seconds of inactivity.
• The 7-segment LEDs will display the address of the BANK in focus.
• One Port Selection LED will be lit, corresponding with the port in focus on the
BANK in focus.
• The Shift LED will light whenever ports 9–16 are selected. To use the 1x8 or 2x8
KVM Switch to select ports 9–16 on a 1x16 or 2x16 KVM Switch, hold down the
corresponding button for one second (the Shift LED will light) then release it.
For example, to select the computer attached to port 9, from Select Mode, press
the button for port 1, and hold it for one second before releasing it; the Switch
will beep and both the Port 1 LED and Shift LED will light.
• The Primary Console LED will be lit, indicating that this Switch is a console.
1. Press the BANK selection buttons to cycle through the BANKs available; each
press increases or decreases the BANK in focus by one, and is immediately
indicated by the 7-segment LEDs.
2. Press the button corresponding to the port that you would like to select. When
you release the button, the Switch will beep, and change the focus to the
selected port. If the user has been restricted from accessing the selected port, a
banner message will display “Access Denied”.
3. If you press the AutoScan button, when you release the button, the Switch will
beep, and change into AutoScan Mode.
P74290ea_F1DExxxC_man.qxd 30-10-2003 11:20 Page 18