


32
USING YOUR SWITCHUSING YOUR SWITCH
33
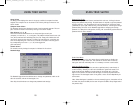
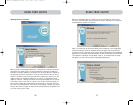
Error Messages and Dialogs
From time to time, it will be necessary to display messages to the user indicating
errors or requesting simple answers to questions. These pop-up screens use the
familiar format of title bar and window body, which contains the text of the
message. It includes appropriate response controls such as OK and Cancel buttons,
based on the nature of the message.
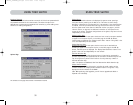
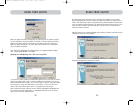
Login Dialog
The Login dialog is a simple window with radio buttons to select the user, and an
edit box for the user to enter a password. If the user is already logged-in, pressing
“Cancel” returns the user to his or her current login (or guest, if the account is
enabled). If the user is not logged in, and guest is disabled, pressing cancel will
close the OSD.
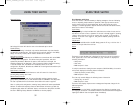
Help Screens
Online help is available within the OSD. Simply press the F1 key, or click on the “?”
button on the right side of the title bar.
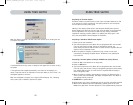
Banner
The banner, a small window that is displayed to inform the user of the console’s
focus, appears as a line of text surrounded by a gray, 3-D frame. It displays the
following information:
• Group name
• Host name
• BANK and port in focus
If multiple consoles are viewing the same computer (MultiView Mode), the console
with control displays the following banner information:
• Viewed by console [console letter]
• BANK and port in focus
The view-only console displays the following banner information:
• Viewing only, no control
• BANK and port in focus
The banner also displays important error messages and important changes in the
KVM configuration.
Splash Screen
When you power-on the Switch, a window appears that displays its product name
and copyright information. This window remains for several seconds then disappears.
Opening the OSD will clear the Splash Screen immediately.
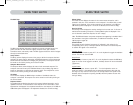
Advanced Button
Activating this button will take the user to the advanced option screen.
Disable Viewing
When “Disable Viewing” is checked, only another administrator may view channels
occupied by the administrator. This function will be active by default in the OSD by
design. For security reasons, admin needs to disable this if need be.
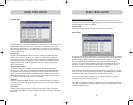
Daisy-Chain this KVM
Checking this box allows Switches set to BANK 00 to communicate with other BANKs
in a daisy-chain configuration. This affects front-panel operations, and other
operational parameters. Whenever the state of this check box is changed, the
following message will be displayed, “This will reset the KVM to change this setting”.
If the user selects “OK”, the Switch will immediately reboot in the new
configuration. By default, Switches set to BANK 00 are configured as standalone (the
check box is cleared).
Steal Control of this Host
This feature allows the KVM administrator to take full control of a host that is
currently being used by other users.
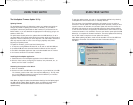
Restore Factory Defaults
Selecting this button will reset ALL user-configurable settings (computer names,
group names, passwords, etc.) to their default values on all BANKs in the daisy-chain.
The user is presented with a confirmation screen before this action is applied.
Note: In a daisy-chain configuration, restoring factory default will cause unpredictable
behavior. To resolve this temporary issue, the administrator will have to go back into
the Options page, select the “Advanced” button, and check the “daisy-chain this KVM”
box after “Restoring Factory Defaults” for BANK 00 to function properly.
P74290ea_F1DExxxC_man.qxd 30-10-2003 11:20 Page 32