


31
CHAPTER 4: Installation and Configuration
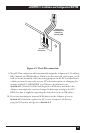
When you see this prompt, you can either:
• Wait five seconds or press [ESC] to continue with the boot process;
• Press [CTRL] [B] to boot from a SCSI CD-ROM attached to the Adapter
(if this capability has been firmware-enabled—see Section 4.6.5); or
• Press [CTRL] [I] to start the Utility.
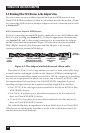
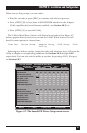
The Utility’s Main Menu (shown, with Device Setup selected, in Figure 4-7
below) appears directly as soon as you run the Utility. When it does, you will
have five main options to choose from:
Scan Bus Device Setup Adapter Setup BIOS Setup Disk
Utility
Selecting any of these options (using the right- and left-arrow keys) will cause the
Utility to display a corresponding submenu; see Sections 4.6.2 through 4.6.6
respectively. You can also exit the utility at any time by pressing <ESC> (Escape);
see Section 4.6.7.
Figure 4-7. The SmartSCSI Device Setup menu screen.
Initio INI-A100U2W SmartSCSI(TM) Setup Utility (C)1998
PCI Bus: ØØ Device:Ø9H Port:61ØØH IRQ:11
Scan Bus Device Setup Adapter Setup Bios Setup Disk Utility
ESC:Exit
↓→↑←
:Select
+
:Change Value F8:Load Defaults
SCSI Device ID #Ø #1 #2 #3 #4 #5 #6 #7
Asynchronous Transfer No Yes Yes No No Yes Yes No
Max. Synchronous Transfer
8Ø.Ø 8Ø.Ø 8Ø.Ø 8Ø.Ø 8Ø.Ø 8Ø.Ø 8Ø.Ø 8Ø.Ø
DOS Space > 1GB Yes Yes Yes Yes Yes Yes Yes Yes
Spin Up Disk Drive No No No No No No No No
Enable Disconnect Yes Yes Yes Yes Yes Yes Yes Yes
Enable Wide Negotiation Yes Yes Yes Yes No No No No
SCSI Device ID #8 #9 #10 #11 #12 #13 #14 #15
Asynchronous Transfer No Yes Yes No No Yes Yes No
Max. Synchronous Transfer
8Ø.Ø 8Ø.Ø 8Ø.Ø 8Ø.Ø 8Ø.Ø 8Ø.Ø 8Ø.Ø 8Ø.Ø
DOS Space > 1GB Yes Yes Yes Yes Yes Yes Yes Yes
Spin Up Disk Drive No No No No No No No No
Enable Disconnect Yes Yes Yes Yes Yes Yes Yes Yes
Enable Wide Negotiation Yes Yes Yes Yes No No No No