


E-30
Important!
• Make sure that printed labels do not accumulate in the area around the tape
outlet. Labels piling up around the tape outlet can cause tape jams and mal-
function.
Tape Cutting
There are two methods for cutting tape. The auto tape cutter cuts the tape
automatically after printing is complete. You can also perform a manual opera-
tion to cut the tape.
Auto tape cutter
The auto tape cutter can be used to perform the following operations.
• To cut the margin at the beginning of a label
• To cut the tape after printing of each label (when AUTO CUT is ON during
Multiple Copy Printing)
• To cut the tape after printing of a label is complete
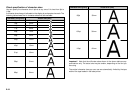
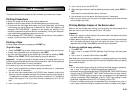
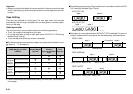
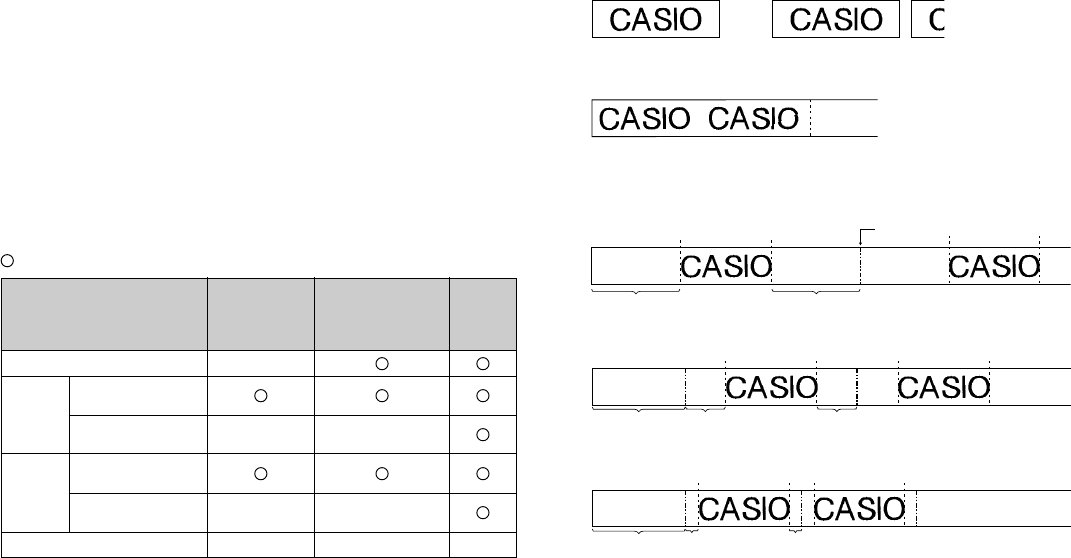
■ The following table shows when auto tape cut is performed and when it is not.
: Tape cut ×: No tape cut
• Certain feed settings can disable tape cutting. In such a case, use scissors to
cut the tape.
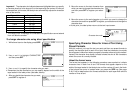
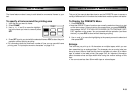
■The following shows how printing is performed in accordance with the AUTO
CUT setting for Multiple Copy Printing.
AUTO CUT: ON
label 1 label 2
AUTO CUT: OFF
label 1 label 2
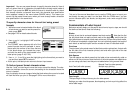
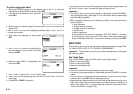
■Auto tape cut is not performed when AUTO CUT: OFF is selected. The auto cut
location is determined in accordance with the feed setting, as shown below.
FEED: LONG
label 1 label 2
About 21 mm About 21 mm
FEED: MEDIUM
label 1 label 2
About 23 mm About 10 mm About 10 mm
FEED: SHORT
label 1 label 2
About 23 mm About 3 mm About 3 mm
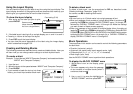
FEED (Margin) and TAPE
LENGTH
FEED: LONG (Large Margins)
About 31mm or more
About 31mm or less
About 24mm or more
About 24mm or less
FEED: MANUAL (No Feed)
Leading Margin
Tape Cut
×
×
×
×
Multiple Copy
Printing
Tape Cut After Each
Label
×
×
×
Final
Tape Cut
×
FEED:
MEDIUM
(Medium
Margins)
FEED:
SHORT
(Small
Margins)
Cut position