


5-3
Cisco Aironet 1400 Series Wireless Bridge Hardware Installation Guide. OL-4072-03
OL-4072-04
Chapter 5 Configuring the Bridge for the First Time
Obtaining and Assigning an IP Address
Note If the bridge is configured with a static IP address, the IP address is not changed.
Obtaining and Assigning an IP Address
To browse to the bridge’s Express Setup page, you must either obtain or assign the bridge’s IP address
using one of the following methods:
• Use default address 10.0.0.1 when you connect to the bridge locally. For detailed instructions, see
the “Connecting to the Bridge Locally” section on page 5-3.
• Use a DHCP server (if available) to automatically assign an IP address. You can find the
DHCP-assigned IP address using one of the following methods:
–
Provide your organization’s network administrator with your bridge’s Media Access Control
(MAC) address. Your network administrator will query the DHCP server using the MAC
address to identify the IP address. The bridge’s MAC address is on label attached to the bottom
of the bridge.
–
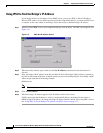
Use the Cisco IP Setup Utility (IPSU) to identify the assigned address. You can also use IPSU
to assign an IP address to the bridge if it did not receive an IP address from the DHCP server.
IPSU runs on most Microsoft Windows operating systems: Windows 9x, 2000, Me, NT, and XP.
You can download IPSU from the Software Center on Cisco.com. For additional information
refer to the “Obtaining and Installing IPSU” section on page 5-9.
Connecting to the Bridge Locally
If you need to configure the bridge locally (without connecting the bridge’s power injector to a wired
LAN), you can connect a PC to the power injector’s Ethernet port using a Category 5 Ethernet cable. You
can use a local connection to the Ethernet port much as you would use a serial port connection.
Note You do not need a special crossover cable to connect your PC to the bridge’s power injector; you
can use either a straight-through cable or a crossover cable.
If the bridge is configured with default values and not connected to a DHCP server or cannot obtain an
IP address, it defaults to IP address 10.0.0.1 and becomes a mini-DHCP server. In that capacity, the
bridge provides up to twenty IP addresses between 10.0.0.11 and 10.0.0.30 to an Ethernet-capable PC
connected to the power injector’s Ethernet port.
The mini-DHCP server feature is disabled automatically when you assign a static IP address to the
bridge.
Caution When a bridge with default settings is connected on a wired LAN and does not receive an IP address
from a DHCP server, the bridge provides an IP address to any DHCP requests it receives.