


5-8
Cisco Aironet 1400 Series Wireless Bridge Hardware Installation Guide. OL-4072-03
OL-4072-04
Chapter 5 Configuring the Bridge for the First Time
What To Do Next
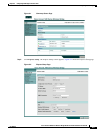
Default Settings on the Express Setup Page
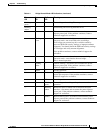
Table 5-1 lists the default settings for the settings on the Express Setup page.
What To Do Next
After your bridge has basic settings, you need to complete your bridge’s configuration. You might need
to adjust the output power level and other network and security settings.
Output Power Level
Your bridge’s output power level might require adjustment under the following conditions:
• The bridge’s output power level must be reduced when using an external dish antenna or when using
the integrated antenna in a multipoint configuration (refer to “Channels and Maximum Power
Levels” section on page C-1).
• When bridges are installed less than 328 ft (100 m) apart, you should reduce their output power to
avoid overloading the bridge’s receivers.
To configure your bridge’s output power level, refer to the Cisco Aironet 1400 Series Wireless Bridge
Software Configuration Guide.
Table 5-1 Default Settings on the Express Setup Page
Setting Default
System Name Bridge
Configuration Server Protocol DHCP
IP Address Assigned by DHCP (default setting); if DHCP is disabled, the
default setting is 10.0.0.1
IP Subnet Mask Assigned by DHCP (default setting); if DHCP is disabled, the
default setting is 255.255.255.224
Default Gateway Assigned by DHCP (default setting); if DHCP is disabled, the
default setting is 0.0.0.0
SNMP defaultCommunity
Read Only
SSID autoinstall
1
or tsunami
2
1. During Install Mode, the SSID is autoinstall.
2. After a static IP address is assigned or the role is changed from Install, the SSID is tsunami.
Broadcast SSID in Beacon Yes
Role in Radio Network Install
Optimize Radio Network for Throughput