


52
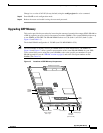
Upgrading GRP Memory
78-4339-09
Implementing Additional Configuration and Maintenance Tasks
Installing New DIMMs
This section provides the procedure for installing new DIMMs.
Caution To prevent system and memory problems when installing DRAM, make sure that the card’s DRAM
DIMMS are +3.3VDC, 60-ns, EDO devices. Do not attempt to install other DRAM devices in the
GRPs DIMM sockets.
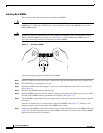
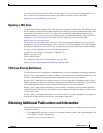
Caution DIMMs are sensitive components that can be shorted by mishandling; they are susceptible to ESD
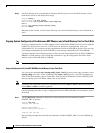
damage. Handle DIMMs by the edges only (see Figure 17); avoid touching the DIMMs, pins, or
traces (the metal fingers along the connector edge of the DIMM).
Figure 17 Handling a DIMM
Use the following procedure to install the new DIMMs:
Step 1 Attach an ESD-preventive wrist strap to yourself following the instructions that came with the strap.
Step 2 Place the GRP on an antistatic mat or pad.
Step 3 Position the GRP so that the faceplate is toward you and the backplane connector is away from you.
(See Figure 15.)
Step 4 Remove a new DIMM from the antistatic bag.
Step 5 Hold the DIMM component-side-up, with the connector edge (the metal fingers) closest to you. Hold
the ends of the DIMM between your thumb and forefinger. (See Figure 17.)
Step 6 Tilt the DIMM to approximately the same angle as the socket and insert the entire connector edge into
the socket.
Note the two notches (keys) on the connector edge of the DIMM. (See Figure 17.) These keys are
intended to ensure correct orientation of the DIMM in the socket.
Step 7 Gently push the DIMM into the socket until the lever is flush against the side of the DIMM socket (see
Figure 16), and the backplane connector of the DIMM is fully inserted. If necessary, rock the DIMM
gently back and forth to seat it properly.
H6507
Key