


9-49
Catalyst 3750 Switch Software Configuration Guide
OL-8550-09
Chapter 9 Configuring Switch-Based Authentication
Configuring the Switch for Secure Shell
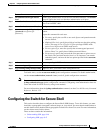
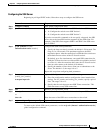
Configuring the SSH Server
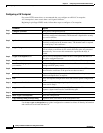
Beginning in privileged EXEC mode, follow these steps to configure the SSH server:
To return to the default SSH control parameters, use the no ip ssh {timeout | authentication-retries}
global configuration command.
Command Purpose
Step 1
configure terminal Enter global configuration mode.
Step 2
ip ssh version [1 | 2] (Optional) Configure the switch to run SSH Version 1 or SSH Version 2.
• 1—Configure the switch to run SSH Version 1.
• 2—Configure the switch to run SSH Version 2.
If you do not enter this command or do not specify a keyword, the SSH
server selects the latest SSH version supported by the SSH client. For
example, if the SSH client supports SSHv1 and SSHv2, the SSH server
selects SSHv2.
Step 3
ip ssh {timeout seconds |
authentication-retries number}
Configure the SSH control parameters:
• Specify the time-out value in seconds; the default is 120 seconds. The
range is 0 to 120 seconds. This parameter applies to the SSH
negotiation phase. After the connection is established, the switch uses
the default time-out values of the CLI-based sessions.
By default, up to five simultaneous, encrypted SSH connections for
multiple CLI-based sessions over the network are available (session 0
to session 4). After the execution shell starts, the CLI-based session
time-out value returns to the default of 10 minutes.
• Specify the number of times that a client can re-authenticate to the
server. The default is 3; the range is 0 to 5.
Repeat this step when configuring both parameters.
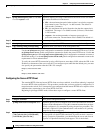
Step 4
line vty line_number
[ending_line_number]
transport input ssh
(Optional) Configure the virtual terminal line settings.
• Enter line configuration mode to configure the virtual terminal line
settings. For line_number and ending_line_number, specify a pair of
lines. The range is 0 to 15.
• Specify that the switch prevent non-SSH Telnet connections. This
limits the router to only SSH connections.
Step 5
end Return to privileged EXEC mode.
Step 6
show ip ssh
or
show ssh
Show the version and configuration information for your SSH server.
Show the status of the SSH server connections on the switch.
Step 7
copy running-config startup-config (Optional) Save your entries in the configuration file.