


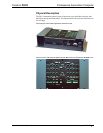


Crestron PAC2 Professional Automation Computer
Setup
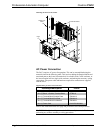
Mounting the PAC2 in the Crestron Automation
Enclosure (CAEN)
CAUTION: The CAEN houses equipment that needs to be air-cooled. Therefore,
mount in a well-ventilated area. The ambient temperature range must be 32°F to
104°F (0°C to 40°C). The relative humidity must range from 0% to 90% (non-
condensing). Furthermore, allow adequate clearance in front of the vented cover for
servicing and ventilation.
NOTE: The CAEN is intended for indoor use only.
NOTE: Reliable earth grounding of equipment mounted in a CAEN should be
maintained. Particular attention should be given to supply connections other than
direct connections to the branch circuit (e.g., use of power strips).
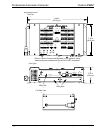
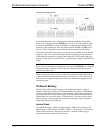
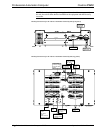
The PAC2 has two flanges that allow the unit to be mounted in a CAEN. Refer to the
latest revision of the CAEN – Automation Enclosures Installation Guide (Doc. 5940)
for more information on the CAEN. The latest version is on the Downloads |
Product Manual section of the Crestron website (www.crestron.com). The following
procedure assumes that two CLX Series Modules have been installed in a double-
wide CAEN. Complete the procedure below to attach the PAC2 to the CAEN. A #2
Phillips screwdriver is required.
1. Using a #2 Phillips screwdriver, attach the four supplied self-tapping
pan Phillips screws (8B x ¼ length) by screwing them in partially (to
allow room to mount the PAC2) below the modules (refer to
illustration on next page).
2. Mount the PAC2 on the CAEN (where you attached the screws), slide
the unit to the right to ensure the screws fully engage the slots in the
flanges, and tighten the screws.
NOTE: For a single-wide CAEN, attach screws on right (screw them in partially),
mount the PAC2 (where you attached screws), attach screws on left and fully tighten
all screws.
Operations Guide – Doc. 5941 Professional Automation Computer: PAC2 • 13