


Crestron PAC2 Professional Automation Computer
Establishing Communication with the PAC2
Before uploading a program to the control system or performing diagnostic
functions, you must connect the control system to the PC. This connection can be
serial or (if an optional Z-Bus card is installed) it can be TCP/IP.
NOTE: For laptops and other PCs without a built-in RS-232 port, Crestron
recommends the use of PCMCIA cards, rather than USB-to-serial adapters. If a
USB-to-serial adapter must be used, Crestron has tested the following devices with
good results:
Belkin (large model) F5U103
I/O Gear GUC232A
Keyspan USA-19QW
Other models, even from the same manufacturer, may not yield the same results.
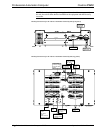
Serial Connection
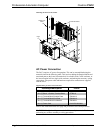
Connect the COMPUTER port on the PAC2 to one of the COM ports (usually COM
1) on the PC. Use a straight-through RS-232 cable with a DB9 male connector on
one end and a DB9 female connector on the other. Most commercially available
cables are acceptable; they should have at least 5 pins for transmit, receive, ground,
and hardware handshaking (pins 2, 3, 5, 7, and 8).
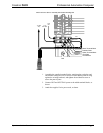
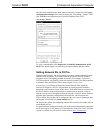
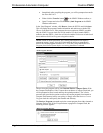
Open the Crestron Viewport and click Setup | Communication Settings to display
the “Port Settings” window (refer to graphic on next page). Then click RS-232 as the
connection type.
The PC communication settings specified here should match the default protocol that
the PAC2 expects. The settings are as follows:
• Port = COM 1 through COM 8. Select the correct COM port on the PC.
• Baud rate = 115200 (You can set the PC and the PAC2 to a different baud
rate, by using the Functions | Set Baud Rate command.
• Parity = None.
• Number of data bits = 8.
• Number of stop bits = 1.
• Hardware handshaking (RTS/CTS) enabled.
• Software handshaking (XON/XOFF) not enabled.
Operations Guide – Doc. 5941 Professional Automation Computer: PAC2 • 19