


92 | Installing System Components
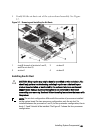
6 Reconnect the system to its electrical outlet and turn on the system,
including any attached peripherals.
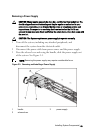
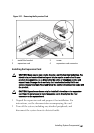
7 Install the air duct(s). See "Installing the Air Duct" on page 89.
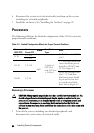
Processors
The following table lists the limited configuration of the C6145 system for
proper thermal conditions:
Table 3-2. Limited Configuration Matrix for Proper Thermal Condition
Processor
(G34 TDP)
Hard
Drive QTY
DIMM
Heat Sink
Type
Note
85 W
3.5" x12
16G
2 kinds of
CPU heat
sink (VC base
+ Cu fin
)
No PCI-E card on PCI-E
slot 2
2.5" x24
115 W 2.5" x18
2.5" hard-drive blank and
carrier should be put on
hard-drive ID 10-12 and
22-24 as Figure 1-4.
140 W 3.5" x8
No PCI-E card on PCI-E
slot 2. 3.5" hard-drive
blank and carrier should
be put on the four slots
in second row of hard-
drive slots as Figure 1-1.
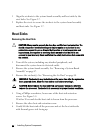
Removing a Processor
CAUTION: Many repairs may only be done by a certified service technician. You
should only perform troubleshooting and simple repairs as authorized in your
product documentation, or as directed by the online or telephone service and
support team. Damage due to servicing that is not authorized by Dell is not
covered by your warranty. Read and follow the safety instructions that came with
the product.
1 Turn off the system, including any attached peripherals, and
disconnect the system from its electrical outlet.