


Desktop Computer 129
For instructions, see the documentation that came with your operating system.
15
Verify that your computer works correctly by running the Dell Diagnostics (see "Dell Diagnostics"
on page 327).
16
Install your operating system on the hard drive.
For instructions, see the documentation that came with your operating system.
Removing and Replacing a Second Hard Drive
For information on RAID configuration, see "About RAID Configurations" on page 268
CAUTION: Before you begin any of the procedures in this section, follow the safety instructions in the
Product Information Guide
.
CAUTION: To guard against electrical shock, always unplug your computer from the electrical outlet before
removing the computer cover.
NOTICE: To avoid damage to the drive, do not set it on a hard surface. Instead, set the drive on a surface,
such as a foam pad, that will sufficiently cushion it.
NOTICE: If you are replacing a hard drive that contains data you want to keep, back up your files before you
begin this procedure.
NOTE: Installation of a second hard drive is restricted to certain configurations of the desktop computer.
1
Check the documentation or the drive to verify that it is configured for your computer.
2
Follow the procedures in "Before You Begin" on page 21.
3
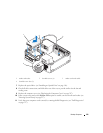
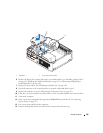
Remove the computer cover (see "Removing the Computer Cover" on page 90).
4
Remove the optical drive (if your configuration has one) (see "Removing an Optical Drive" on
page 115).
5
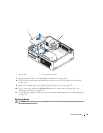
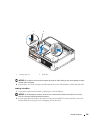
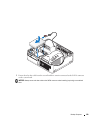
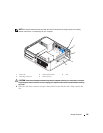
To remove the second hard drive:
a
Pull up on the drive release latch and slide the hard drive towards the back of the computer.
b
Disconnect the data and power cables from the back of the drive.
c
Then, lift up to remove the drive from the computer.
6
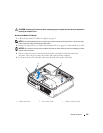
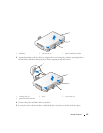
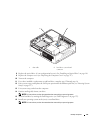
To replace the second hard drive:
a
Align the shoulder screws with the screw guides, and slide the drive into the bay until it clicks
into place.
b
Connect the power and data cables to the back of the drive.