


Removing and Installing Parts 93
Processor
CAUTION: Before you perform this procedure, follow the safety instructions on page 9.
Installing the Processor
NOTE: It is recommended that only a technically knowledgeable person perform this procedure.
CAUTION: The processor can get very hot during normal operation. Ensure that the processor has had
sufficient time to cool before you touch it.
1
Follow the instructions in "Before You Begin" on page 68.
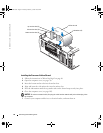
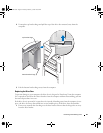
2
Open the computer cover (see page 70).
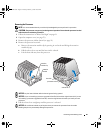
3
Remove the processor airflow shroud (see page 91).
If you are replacing a processor, follow steps 4, 5, and 6 in "Removing the Processor" on
page 95.
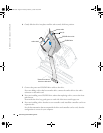
NOTICE: You must position the processor correctly in the socket to avoid permanent damage to the
processor and the computer.
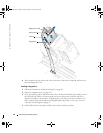
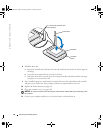
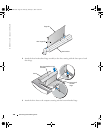
4
If the release lever is not extended to the release position, move it to that position.
5
Align pin-1 (the imprinted corner) of the processor and pin-1 of the socket.
NOTICE: Processor pins are delicate. To avoid damage, ensure that the processor aligns properly with
the socket, and do not use excessive force when you install the processor.
6
Carefully set the processor in the socket and press it down lightly to seat it.
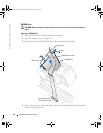
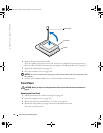
7
Rotate the release lever back toward the system board until it snaps into place, securing the
processor.
T2310bk2.book Page 93 Thursday, February 5, 2004 10:00 AM