


26
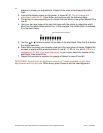
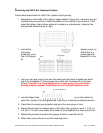
Examining the BI-D BLACK Alignment Pattern.
Follow these steps when the BI-D BLACK patterns finish printing:
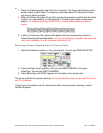
1. Depending on the width of the plate or paper loaded in the printer, more than one set
of patterns may be printed. Locate the patterns in the middle of your printout. In the
steps that follow, refer to those patterns to make your adjustments, instead of the
ones printed toward the left or right.
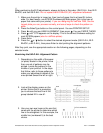
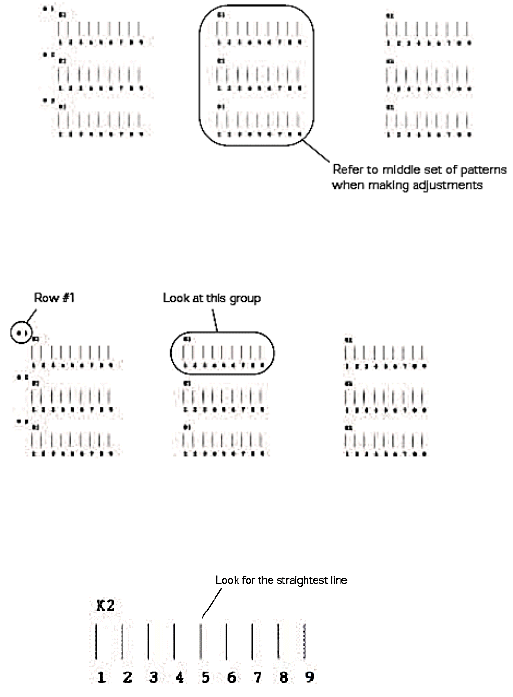
2. Look at the display screen on the printer. Notice that it is prompting you to choose
the best line in the group labeled K1 in row #1.
3. Use your own eye loupe or the one that came with the printer to determine
which
line is the straightest. In this example, the middle line (numbered 5) is the best
choice
(If number 5 is the straightest line in each group, the print head is
already properly aligned. Press Pause to
exit the head
alignment early)
.
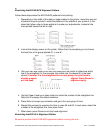
4. Use the Paper Feed up or down button to select the number of the straightest line.
Note that 5 is always the default selection.
5. Press Enter to accept your selection and go to the next group of lines.
6. Repeat this process to examine the lines in rows #2 and #3. In each case, select the
number of the straightest line, then press Enter.
7. When done, press Pause to exit the head alignment.
Examining the BI-D ALL Alignment Pattern
Be sure to perform the BI-D BLACK adjustment before running this one.
All Trademarks used in this document are the properties of their respective owners. Rev. 1.3 4/6/2004