


73
Uninstalling Windows 2000 Software
1. Right-click the PhotoStarter icon on the Windows taskbar, and click End on
the menu that pops up.
2. Left-click the Eject Hardware icon on the Windows taskbar, and click Stop
EPSON SP 875DCS Storage
. If you have a Memory Stick and PC card adapter
in the printer’s PC card slot, wait for the confirmation message, then press the
card eject lever to eject the Memory Stick and adapter.
3. Right-click the Camio Viewer icon on the Windows taskbar, and click Exit.
4. Double-click My Computer, then double-click the Control Panel icon.
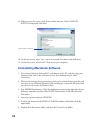
5. Double-click Add/Remove Programs. Click EPSON Printer Software in the
program list, and then click the Change/Remove button.
6. On the Printer Model tab, select the EPSON Stylus Photo 875DCS printer icon.
Then click the Utility tab. Make sure EPSON USB Memory Card Driver is
selected, then click OK.
7. Follow the instructions on the screen. When you’re done, click EPSON
PhotoStarter
in the program list; then click the Change/Remove button.
8. Follow the instructions on the screen. When you’re done, select EPSON USB RW
Switcher
and click the Change/Remove button.
9. Follow the instructions to remove USB RW Switcher. Then select Image Expert
and click the Change/Remove button again.
10. When you’re done removing programs, close the Add/Remove Programs window
and double-click the
Add/Remove Hardware
icon. You see the Add/Remove
Hardware wizard.
11. Click
Next
. On the following screen, select
Uninstall/Unplug a device
and click
Next
.
12. On the next screen, make sure
Uninstall a device
is selected and click
Next
.