


1-16
Setting Up the Printer
Sun-E+
Rev. C
A5 size Chap1.fm
4/15/99 Pass 0
L
Proof Sign-off:
<Crestec> _______
<Yamanouchi> _______
<Crestec> _______
If you are using the floppy disk version of the software, make a
backup copy of the EPSON printer software disk before you
begin installation. If you wish to make a floppy disk version of
the printer software on your CD-ROM, you can use the Driver
disk creation utility included on the CD. See "Installing in
Windows 95, 98, and NT4.0" or "Installing in Windows 3.1 and
NT 3.5x" in this Chapter.
Installing in Windows 95, 98, and NT 4.0
Follows these steps below to install the printer software for
Windows 95, 98, or Windows NT 4.0:
Note:
Installing the printer software for Window NT 4.0 may require network
administration privileges. Ask your network administrator for more
information.
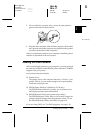
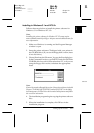
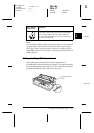
1. Insert the printer software CD shipped with your printer in
the CD-ROM drive. The Install dialog box appears. (For
floppy disk users, insert disk in a disk drive, then double-click
the FD drive icon and double-click the Setup.exe icon.)
2. Click
Install
to start the printer software installation.
Note:
❏
If the New Hardware Found screen or any other Wizard appears
when you turn on your computer, click
Cancel
and follow the
steps above.
❏
Installation time varies depending on your computer.
❏
If you wish to make a floppy disk version of the printer software
included on your CD-ROM, run EPSETUP program. In the dialog
box that appears, click the Driver disk creation utility button and
follow the on-screen instruction.
For information on opening and using the software, see "Using
the Printer Software" in Chapter 4. See also "Using EPSON Status
Monitor 2" in Chapter 6.