


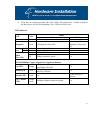

Please follow the guidelines below when choosing a location to install the switch:
x The surface must support at least 3 kg. Do not place heavy objects on the switch.
x Visually inspect the power cord and AC power connector.
x Make sure that there is proper heat dissipation from and adequate ventilation around the
switch.
Desktop or Shelf Installation:
When installing the switch on a desktop or shelf, it is recommended that you secure to the unit the
four rubber feet that are included with the package. Attach these cushioning feet to each of the
four corners at the bottom of the device. Allow adequate space for ventilation between the device
and the objects around it.
Rack Installation:
The switch can be mounted on a standard-sized, 19-inch rack that can be placed in a wiring closet
with other equipment. To install, attach the mounting brackets to the side panels of the switch and
secure them with the screws provided. Then, use the screws provided with the equipment rack to
mount the switch on the rack.
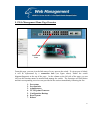
Power on:
The switch features a built-in AC power supply and operates within the following range: 90-260V
AC, 50-60Hz. The AC power connector is located at the rear of the unit. The switch’s power
supply will adjust to the local power source automatically and may be turned on without having
any or all LAN segment cables connected.
After the power switch is turned on, the LED indicators should respond as follows:
x All LED indicators will blink for a few moments. The blinking LEDs indicate a reset of
the system.
x The “Power” LED indicator will blink while the switch loads its onboard software and
performs a self-test. After approximately 20 seconds, the LED will light up again to
indicate that the switch is ready for use.
x The “100M” and “Link/Activity” LED indicators will remain lit or unlit depending on the
status of connection and activity of each port.
9