


Handle assembly
Before you begin:
v Read Appendix B, “Safety information,” on page 127.
v Review the information in “System reliability considerations” on page 23.
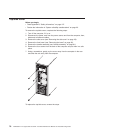
To remove the handle cap, complete the following steps:
1. Turn off the computer, if it is on.
2. Disconnect the power cord from the power source and from the computer; then,
disconnect all external cables.
3. Use a flathead screwdriver to gently press in and down on the tabs on the
interior side wall of the handle.
Tab locations
4. Lift up on the handle cap to separate it from the handle support.
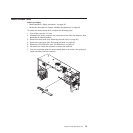
5. Turn the system back to the tower orientation; then, remove the top handle.
a. Carefully use a flat-blade screwdriver to push in the tabs inside the plastic
cover on the top of the system; then, remove the plastic cover. Store the
cover for possible future use.
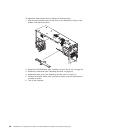
b. Grasp the metal handle and slide it toward the rear of the computer to
remove it from the computer. Store the metal handle for possible future use.
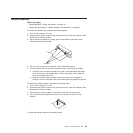
To remove the handle support, complete the following steps:
1. Turn off the computer, if it is on.
2. Disconnect the power cord from the power source and from the computer; then,
disconnect all external cables.
3. Firmly grasp the handle support, and slide it away from the front bezel.
4. Lift up on the handle support to remove it from the slots in the top of the
chassis.
To install the handle assembly, reverse the steps.
Chapter 5. Field replaceable units 81