


32
Memo
● Clip file numbers of clip files are generated from the last number of the file in the
PC card. If the last file is erased when the power is turned on, that number will
not be used. After formatting, numbers will be generated from 0001.
● The generated time of the clip file is the time when recording is completed.
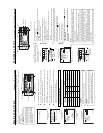
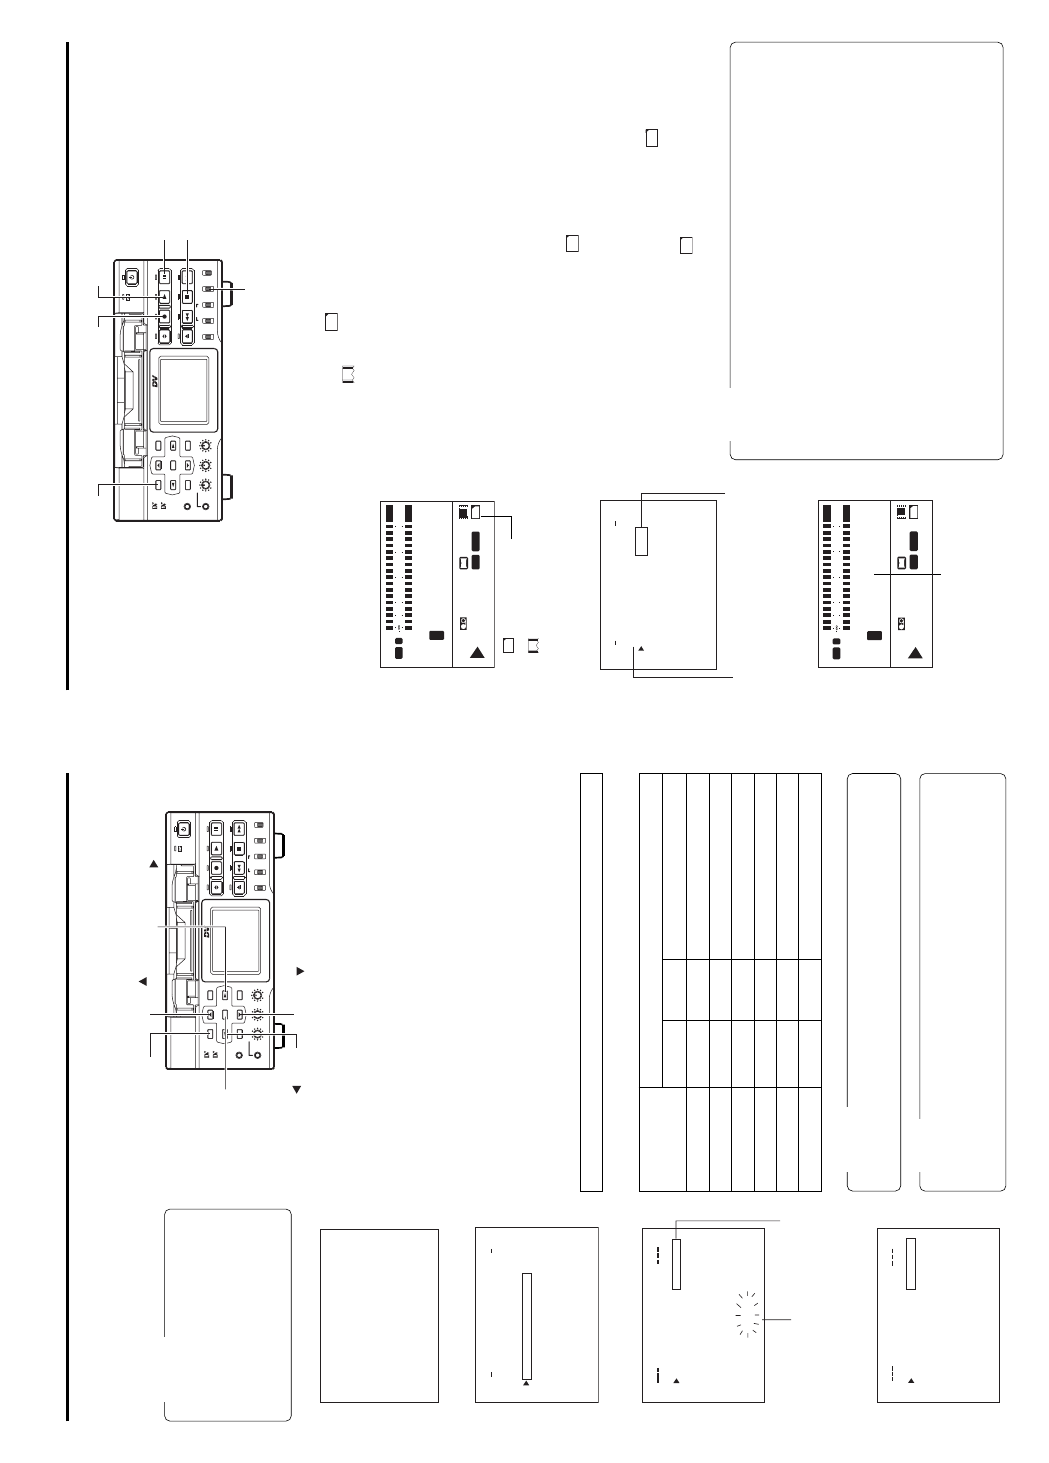
1.
Press the MENU button to display the TOP MENU screen.
2.
Use the DISP (6) or the BLANK (7) button to select NETWORK PACK CONFIG
menu screen ¥ MOVIE CLIP SETUP menu screen.
3.
Set FORMAT in the MOVIE CLIP SETUP menu screen to “EXECUTE” and press
the SET button.
● The formatting begins. During formatting, “FORMAT” appears on the screen.
4.
When formatting is completed, to the MOVIE CLIP SETUP menu screen returns.
The FORMAT setting will return to CANCEL.
5.
To return to the NETWORK PACK CONFIG menu screen, select PAGE BACK and
press the SET button or SEARCH– (8) botton.
● To return to the normal screen, press the MENU button.
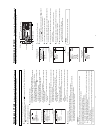
Recording on a CF card Preparing for CF card recording
CF card recording cannot be performed when transmitting streaming data from the LAN terminal during the SPLIT mode.
If the CF memory card is unformatted when performing any of the operations shown below, “NO CF FORMAT” will appear in the LCD
screen/video monitor.
● Executing DELETE ALL
● Recording to the CF memory card
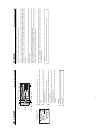
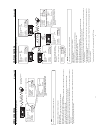
NETWORK PACK CONFIG
menu screen
Set to EXECUTE
Flashing display during
formatting
NET WORK
ORTWENKACK
P
ON
C
IG
F
ENCODE
MPEG REC
T
RGI
MOV I E
C
LI
P
MENU R ES ET CANCE L
PAGE B
A
CK
T..SE P
U
T..SE P
U
T..SE P
U
M
AIN
(
W
M
Pund
r
8
)
e
(
C
F
View
r
)
e
TC 00:00: 000.0
MOVIE CLIP SETUP
menu screen
CF memory recording time
Estimated recording time of CF memory cards is shown below:
CF memory
BIT RATE
card size
384kbps 256kbps 128kbps ~ 56kbps
16MByte 3min. 5min. 10min. or more
32MByte 7min. 11min. 20min. or more
64MByte 15min. 22min. 40min. or more
128MByte 30min. 44min. 80min. or more
192MByte 46min. 66min. 120min. or more
256MByte 61min. 88min. 160min. or more
Caution
The actual recording time may differ from the estimate recording time shown above
depending on the recording subject and movement.
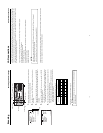
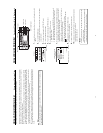
MOVIE CLIP SETUP
menu screen
Caution
If the unit enters MOVIE CLIP by oper-
ating the menu or the Operation button
during formatting CF card, a display of
the LCD viewer can go wrong. However,
if you operate the menu after formatting
has been completed, you will be able to
regain a normal display.
DELE ETALL
Y
NCELCA
NCECA
FORMA
T
L
REPEAT
IEOVMCIP
L
TUSE P
CAPT
ILE
RU
E
..
RPEA T
P
LA
PAGE B
A
CK
F
SEND
TC 00:00: 000.0
T
DE
E
LE ETALL NCELCA
PU
ECU
T
EEX
IEOVMCIP
L
FORMAT
RPEAT
FOR
M
AT
CAPT
ILE
RU
E
.
.
S
E
T
PAGE B
A
CK
F
SEND
Y
PLA
PRE
E
A
TC 00:00: 000.0
NO CF FORMAT!
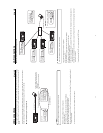
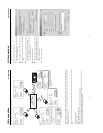
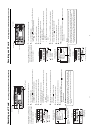
BR-DV6000
PROFESSIONAL
MENU RESET
A.DUB
EJECT
COUNTER
AUDIO INPUT
SELECT
MONITOR OUTPUT REMOTE
LOCAL
CTL L
MIX
R
CH-1/2
MIX
CH-3/4
DV
LINE
Y/C
(CPN)
TC
UB
REW STOP FF
REC
OPERATE
PLAY PAUSE
DISP
SET SEARCH+
BLANK CUE UP
HOLD
PHONES REC LEVEL
CH-1/3 CH-2/4
MIC
SEARCH–
Mini
MENU button
SET button
SEARCH– ( ) button
DISP ( ) button
BLANK ( ) button
SEARCH+ ( ) button
33
1.
Insert a CF memory card into the Network Pack.
2.
Turn on the BR-DV6000 power.
Check to see that the
C
F
display appears on the LCD screen. (When the power is
turned on,
display will flash during initialization.)
3.
Insert a recordable DV cassette tape.
4.
Select the input signal using the INPUT SELECT switch.
5.
Press the MENU button to display the TOP MENU screen.
6.
Set the NETWORK PACK CONFIG menu screen.
q Set MPEG REC to “TRIG”.
w Set the video/audio compression in the ENCODE SETUP menu screen.
(
☞
page 8)
e
When completed with settings, press the MENU button to return to the normal screen.
7.
Press the REC button and the PLAY button simultaneously to start recording on
the DV cassette tape as well as video/audio streaming data on the CF memory
card. (Hold down the REC button then press the PLAY button.)
● During CF memory card recording,
C
F
display will light red.
8.
To stop recording, press the PAUSE button.
9.
To resume recording, press the PLAY button.
10
.
To end recording, press the STOP button.
* Before turning off the power, check to make sure the
C
F
indicator on the
LCD screen is white.
Turning the power off when the
C
F
indicator is red will damage the re-
corded clip file.
Memo
● Streaming data can be transmitted to a PC during LAN terminal connection.
● When the DV cassette tape has reached the end during recording, CF memory
card recording will also stop.
● Every time recording is performed, the recorded event is stored in the clip list of the
CF memory card.
All events can be played back on the MOVIE CLIP screen. (
☞
page 39)
●
The CF memory card remaining warning is displayed on the LCD screen (
☞
page 65)
●
If the recording made to the CF Memory Card is only about 5 seconds or so or when
short files are continuously registered, file(s) may not be created or the still images
displayed during thumbnail (CF file) selection may take some time to appear.
● When recording to a CF Memory Card while in the TRIG mode, clip list (CSV file)
will be created for viewing using the CFViewer.
The CSV file name will be the value of the user's bit (UB) set in BR-DV6000. CFViewer
will not function properly when there are frequent changes in the UB value (when
using UB as the time code).For details concerning UB, please refer to the operator’s
manual of BR-DV6000.
●
Video recorded on a CF Memory Card will start slightly slower than that recorded on tape.
Recording on a CF card Recording to DV tape and CF card Simultaneously
● “NO CF FORMAT!” will appear if the in-
serted CF memory card is not formatted.
Format the card in the MOVIE CLIP SET
menu screen. (
☞
page 32)
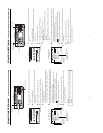
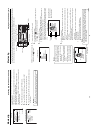
LCD screen
ENCODE SETUP menu screen
C
F
: Red display during
recording
: Initializing
NETWORK PACK CONFIG
menu screen
LCD screen
CF memory card
remaining warning
NET WORK
ORTWENKACK
P
ON
C
IG
F
ENCODE
MPEG REC
T
RGI
MOV I E
C
LI
P
MENU RES ET
PAGE B
A
CK
T..SE P
U
T..SE P
U
T..SE P
U
M
AIN
(
W
M
Pund
r
8
)
e
CAN
C
E
L
(
C
F
View
r
)
e
TC 00:00: 000.0
Set to TRIG
BR-DV6000
PROFESSIONAL
MENU RESET
A.DUB
EJECT
COUNTER
AUDIO INPUT
SELECT
MONITOR OUTPUT REMOTE
LOCAL
CTL L
MIX
R
CH-1/2
MIX
CH-3/4
DV
LINE
Y/C
(CPN)
TC
UB
REW STOP FF
REC
OPERATE
PLAY PAUSE
DISP
SET SEARCH+
BLANK CUE UP
HOLD
PHONES REC LEVEL
CH-1/3 CH-2/4
MIC
SEARCH–
Mini
PLAY button
PAUSE button
STOP button
INPUT SELECT switch
REC buttonMENU button
CH1
NDF
12
H
34
M
34
S
10
F
FREE
CH2
PLAY
SP222min
01/02/03
01:23:45 INS
AM
OVER
48k
T
C
L
dB010203040
OVER
W
Y/C
VA
SYNC
‰
e
CF
CH1
NDF
12
H
34
M
34
S
10
F
FREE
CH2
PLAY
SP222
min
01/02/03
01:23:45 INS
AM
OVER
48k
T
C
L
dB010203040
OVER
W
Y/C
VA
SYNC
‰
e
CF
CF REMAIN 60SEC!