5. Remove the power supply or power supplies from the power-supply cage (see
“Removing a hot-swap power supply” on page 174).
6. Rotate the power-supply cage to its open position (see “Opening the
power-supply cage” on page 158).
7. Remove the air baffle (see “Removing the air baffle” on page 169).
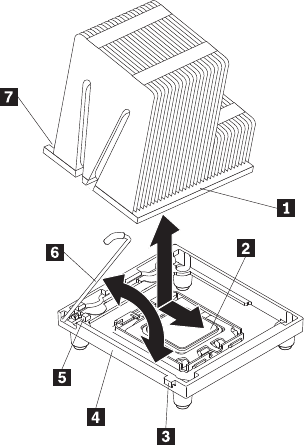
8. Remove the microprocessor heat sink:
a. Lift the heat-sink release lever to the fully open position.
b. Rotate the back of the heat sink out of the retention bracket and remove
the heat sink from the server.
Attention: Do not touch the thermal grease on the bottom of the heat
sink. Touching the thermal grease will contaminate it. If the thermal grease
on the microprocessor or heat sink becomes contaminated, you must
replace it. See “Thermal grease” on page 226 for more information.
1 Heat sink flange
2 Microprocessor
3 Release level locking tab
4 Retainer bracket
5 Alignment tab
6 Heat sink release level
7 Notch
9. Lift the microprocessor-release latch to the fully open position (approximately
135° angle); then, lift the bracket frame and remove the microprocessor from
the socket.
Chapter 7. Installing optional devices and replacing customer replaceable units 219


