2. Open the microprocessor socket by pressing down on the end of the release
lever, moving it to the side, and slowly releasing it to the open (up) position.
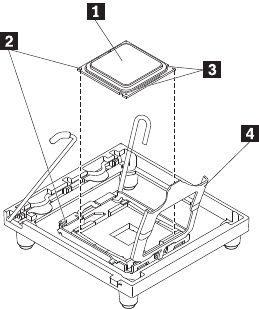
1 Microprocessor
2 Alignment triangles
3 Notches
4 Microprocessor bracket frame
3. Open the microprocessor bracket frame and remove the microprocessor filler,
if one is installed.
Attention:
a. Do not touch the microprocessor contacts; handle the microprocessor by
the edges only. Contaminants on the microprocessor contacts, such as oil
from your skin, can cause connection failures between the contacts and
the socket.
b. Handle the microprocessor carefully. Dropping the microprocessor during
installation or removal can damage the contacts.
c. Do not use excessive force when you press the microprocessor into the
socket.
d. Make sure that the microprocessor is oriented, aligned, and positioned in
the socket before you try to close the lever.
4. Install the microprocessor:
a. Touch the static-protective package that contains the microprocessor to any
unpainted metal surface on the server. Then, remove the microprocessor
from the package.
b. Remove the protective cover, tape, or label from the surface of the
microprocessor socket, if any is present.
c. Align the microprocessor with the socket. The microprocessor has two
notches that are keyed to two tabs on the sides of the socket. A
triangle-shaped indicator on one corner of the microprocessor points to a
45-degree angle on one corner of the socket.
d. Carefully place the microprocessor into the socket. Do not use excessive
force when you press the microprocessor into the socket.
Note: The microprocessor fits only one way on the socket.
5. Close the microprocessor bracket frame and hold it down; then, close the
microprocessor retention latch and lock it securely in place.
222 ThinkServer TD200x Types 3719, 3821, 3822, and 3823: Hardware Maintenance Manual


