


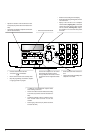
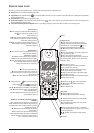
14
notE
If you have chosen the 12-hour time format, the display of the
fax machine will show the letter “p” (post meridiem) or the
letter “a” (ante meridiem). To switch from one format to the
other:
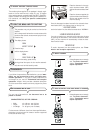
1. Repeat the procedure until the message "DATE AND TIME -
SET DATE/TIME" appears and then press the
key.
2. Position the cursor, using the
|
/
}
keys, below the letter to be
modified.
3. Press the keys
.
NOTe
On the display of the cordless phone, the time is always shown
in 24-hour format and the date displayed is made up of the
day and the month only.
note
To change the date and time on the cordless phone, see "To
change the date and time on the cordless phone" below.
TO SWITCH FROM A PUBLIC LINE TO A PRIVATE LINE (PBX)
This procedure may only be carried out from the fax
machine.
The fax machine is set up for connection to a public line
but you can connect it to a private line and use it on a
public line, too. To do this, proceed as follows:
• Select the "PRIVATE(PBX)" parameter.
• Set the same dialling mode (tone or pulse) as the one
used by the private telephone exchange that manages
the line to which you have connected the fax machine.
If in doubt about the choice to be made, ask the com-
pany that manages your private telephone network.
To switch from the public line to the private line:
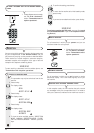
1. Press the key:
The display shows:
MENU
RECEPT. SET-UP
2. Press the keys
until the display shows:
MENU
INSTALLATION
3. Press the key:
The display shows:
INSTALLATION
STATION NAME
4. Press the keys
until the display shows:
INSTALLATION
TEL.LINE SETUP
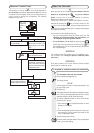
5. At this point, you can choose between the following
options:
"SET DATE/TIME" - To modify the date and time set
previously.
"DATE FORMAT" - To choose the date format that will
be shown on the display.
"HOUR FORMAT" - To choose the time format that will
be shown on the display.
6. To display one of the options listed above, press the
keys:
7. To confirm the setting, press the key:
To set the parameter, see the notes below.
8. If you have made a mistake or wish to abort the proce-
dure in progress, press the key:
notE
If you have chosen the "SET DATE/TIME" option, proceed as
follows:
1. Enter the new date and time (e.g. 13-09-07; 18:00), by press-
ing the keys: - . As each digit is entered, the cursor will
move to the next one.
2. If you wish to move the cursor to digits to be modified, press
the keys:
|
/
}
.
3. Then overwrite the digits with the correct ones, by pressing
the keys:
- .
4. To confirm the setting, press the key:
.
5. To return the fax machine to its initial stand-by mode, press
the key:
.
6. If you want to move back one function, press the key:
.
If you have chosen the "DATE FORMAT" option, proceed as
follows:
1. The display shows: "DATE FORMAT" and "DD/MM/YY".
2. If you want to select a different format from the one displayed,
press the keys:
.
3. To confirm the setting, press the key:
.
4. To return the fax machine to its initial stand-by mode, press
the key:
.
5. If you want to move back one function, press the key:
.
If you have chosen the "HOUR FORMAT" option, proceed as
follows:
1. The display shows: "HOUR FORMAT" and "24 HOURS".
2. If you want to select a different format from the one displayed,
press the keys:
.
3. To confirm the setting, press the key:
.
4. To return the fax machine to its initial stand-by mode, press
the key:
.
5. If you want to move back one function, press the key:
.