5
OfficeRight™
DI200
Operator’s Guide
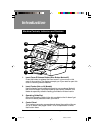
5. Moistener Tank
This tank contains E-Z Seal
®
solution or water to moisten and seal
envelope flaps. It slides out to the right for refilling and has an oval
level indicator window at the front so you can easily check fluid level.
6. Lifting Handles (One Each Side)
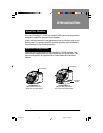
Always lift the OfficeRight™ DI200 using the side handles. DO NOT
lift the machine by any of the feeders or the stacker.
7. Second Sheet Feeder A2 (Optional)
You can add this feeder to the machine to enable folding and
inserting of a second sheet into the envelope. It functions in exactly
the same way as the standard sheet feeder, A1.
IMPORTANT: When you use both sheet feeders A1
and A2 together, always load the address bearing
sheet into sheet feeder A2. If you fail to do this, the
address won’t show in the envelope window. Always
load sheets into feeder A2
face down
and
bottom edge
first,
that is, with the bottom edge of the sheet furthest into the
machine.
8. Standard Sheet Feeder A1
This feeder enables folding and inserting of a sheet into the envelope.
Always load sheets into this feeder
face down
and
bottom edge first.
9. Manual Feeder M
Use this feeder to manually feed stapled sets of
up to three sheets
each.
The machine waits for you to feed each set by hand into this
feeder before it folds and inserts the set automatically. Always feed
sheets into this feeder
face down
and
bottom edge first,
that is, with
the bottom edge of the sheet furthest into the machine.
10. Stacker
The machine delivers finished pieces to this area.
11. Front Cover D Release Button (Blue Button Marked D)
Press this button to release the front cover if a jam occurs in this area
of the machine. The display prompts you if you need to open this
cover to remove jammed material.
12. Envelope Feeder B
This feeder feeds envelopes into the inserting area where they are
filled with sheets or inserts from other feeders.
Introduction
02 A5 p1-10 6/16/03, 4:32 PM5


