


17
WEBBING FILMS WITH A RELEASE LINER (NORTH AMERICA)
The following are the basic webbing procedures for
webbing films with a release liner. It is important to
follow the webbing instructions for films specific for
your location.
• Select films slightly wider than the image to allow
for a border without film waste. A border of 1/8”
to 1/4” (3 - 6mm) is adequate.
• Load and center the films on top and bottom
unwind shafts with the dull adhesive side facing out
and the unwind brake tension released.
NOTE! Check if the film widths of the lower
and upper web are the same!
• Remove the front table for easier webbing access.
• Remove the Wind-up Idler and place a spare core
over it and insert back into place.
• Apply either double stick tape or a strip of the
pressure-sensitive mounting adhesive film across
the width of the spare core and remove the backing.
• TOP FILM: (film with a release liner) Pull the film
forward off the top unwind shaft and adhere the
release liner (facing up) smoothly to the adhesive on
the core. Take care to ensure that the release liner is
pulled square with the roll of film and that no
diagonal wrinkles are apparent.
• Separate the film from the release liner secured to
the core and pulling the film squarely downward,
adhere it to the film draped over the face of the
bottom roller.
TIP: Using a piece of tape will assist with this
step. Adhere the tape securely to a corner of the
film on the spare core so that the tape extends
past the edge. Pull the tape, and the film will
separate from the release liner.
• BOTTOM FILM: Pull the film up from the bottom
unwind shaft and place it evenly over the top film
across the face of the top roller.
• Set the Shim Wheels to 1/16” (2mm) to allow for
the thickness of a leader-board.
• FILMS INTO NIP: Use the leader-board to push
the film(s) into the main roller nip.
• Lower the top roller and return the in-feed table to
its working position.
NOTE! Keep the film under tension (holding
back on the film roll) to prevent the
photoelectric eyes being tripped.
• Using the foot switch, advance the leader board
through the nip.
• Release the footswitch, raise the top roller and set
the Shim Wheels to ‘0’, then lower the roller again.
• Moving to the rear of the laminator, with the film
and leader board hanging over the rear table, cut off
the leader board.
• Return to the front of the laminator and using the
footswitch, apply light unwind brake tension
gradually on both unwind shafts until there are no
wrinkles in the film as it goes into the nip
NOTE! Best results will be obtained when the
film unwind tension is zero or very light.
• Run the laminator for about 3 feet (1 meter), to
work out any wrinkles. If wrinkles persist, cut the
film and web the laminator again.
YOU ARE NOW READY TO FEED IMAGES!
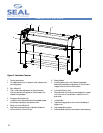
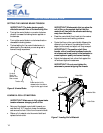
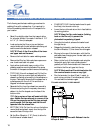
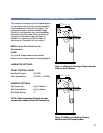
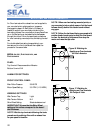
Unwind
Shaft
TOP
ROLLER
BOTTOM
ROLLER
Wind-Up
Idler
Pressure-Sensitive Over-Laminate
Pressure-Sensitive Mounting Adhesive
Unwind
Shaft
Release Liner
Figure 9. Webbing films with Release Liners for
North America