


6
UNPACKING, SET-UP AND INSTALLATION
ONLY SKILLED PERSONNEL SHOULD PERFORM
INSTALLATION. READ AND COMPLY WITH ALL
WARNINGS AND FOLLOW THE PROPER
INSTALLATION PROCEDURES AND SAFETY
GUIDELINES.
• Take into account the weight of the laminator in its
crate (1080 lb./490 kg shipping weight) when
moving. Use equipment with which the weight can
be safely lifted. The laminator is transported on a
wooden pallet (skid). If your laminator is still on its
skid, you can move it with a forklift to put it near its
place of use.
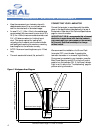
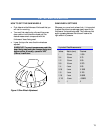
IMPORTANT! Set the forks of the forklift to
the maximum lifting width of the laminator, so
the laminator’s center of gravity is central
between the forks.
• NOTE: We recommend that you save the transport
bolts, nuts and plates of the shipping crate for any
major moves that you plan to make with the
laminator in the future.
• Remove the transport bolts from the skid’s
transport plates with an open-end wrench or
adjustable wrench. Using the wrench, back the bolt
up enough to clear the cabinet castors for ease in
moving.
• Your laminator has castors to allow for easy
moving. Roll the laminator to the location it will be
used. (See Workspace Area Diagram – Figure 1).
• Lock the castors once it is in place and remember to
unlock them before moving the laminator again.
• Remove the compressor (if included) and the length
of compressed air line.
• Remove the cardboard boxes containing the table
and Wind-up Idler.
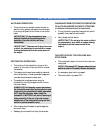
Figure 2. Moving the laminator with a forklift.
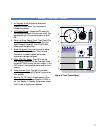
ACCESSORIES INCLUDED:
• Spare O-Rings for Wind-up Drive Assembly
• 5/16 T-handle for Brakes and Lock Collars
• 9/64 & 5/32 Allen Wrenches
• Grease Gun Kit
• Spare Fuses
• Tape Measure
• Snitty Safety Knife
• Image Roll Cleaner
• Roll Cleaning Towel
• Owner’s Manual
• Air Compressor (U.S. and Canada)
• Quick Connect Coupler (supplied with all
laminators)
• Cabinet Door Keys