


7
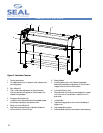
UNPACKING, SET-UP AND INSTALLATION
UNPACKING YOUR LAMINATOR
• Remove the transport packing and the plastic
shrink-wrap the laminator is wrapped in to avoid
moisture penetration.
• Remove the accessory kit package from the top of
the laminator, which includes the necessary tools
for installation/operation.
• Remove the footswitch from the top of the
laminator and remove the foam wrapped around it.
Place the footswitch in a position that is accessible
while feeding images.
• Remove the front table from the cardboard box and
the protective wrap and set it aside.
• Remove the protective foam wrapped around the
front table arms and insert the table into position.
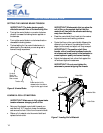
• Remove the Wind-up Idler from the box.
• Cut and remove the tie straps securing the Unwind
Shafts and remove the foam wrap from the ends.
• The Quick Connect Coupler (included in the
accessory kit) connects the compressor to the
laminator.
• The compressor plugs into any standard wall outlet.
• The top roller will go up automatically when air is
connected.
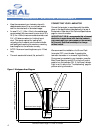
• Remove the foam placed between the top and
bottom roller.
• Remove the stickers securing the protective paper
on the rolls using your fingers only.
• Then gently pull the paper towards you to unwind
off the roll.
WARNING! DO NOT USE OPEN BLADES
TO REMOVE THE PROTECTIVE PAPER
ON THE ROLLERS.
• Roller damage caused by improper use of cutting
tools will void the user’s warranty. Small cuts and
imperfections in the rollers greatly affect the quality
of the output and roller replacement costs are
expensive.
• Install the Wind-up Idler into place on the front
Wind-up Assemblies.
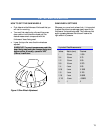
LEVELING YOUR LAMINATOR
• Use an open-end or adjustable wrench to turn the
transport bolts down until the bolts are positioned
flat against the floor.
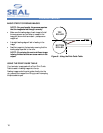
• Insert a 3’ x 1’ (91cm x 30cm) piece of foam board
across the center of the laminator between the top
roller and the back table and place the level in the
center on top of this foam board.
• Adjust the leveling feet for each side cabinet until
level.
• Next, place the level on the tops of each of the
cabinets lengthwise and adjust the leveling feet from
the front to the rear of the cabinet as needed.