


Printing Guide — Installing Client Software for Macintosh 173
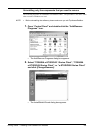
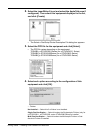
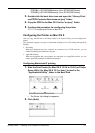
8. Enter the Desktop Printer name and click [Save].
• The printer is added to the desktop.
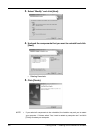
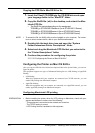
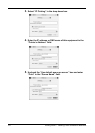
9. Double-click the desktop printer icon that you created.
• The Desktop Printer utility window opens.
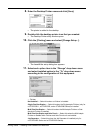
10. Click the [Printing] menu and select [Change Setup...].
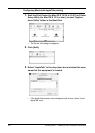
• The LaserWriter setup dialog box appears.
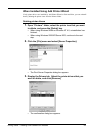
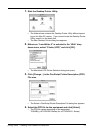
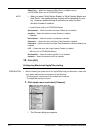
11. Select each option item in the “Change” drop down menu
and select installed option in the “To” drop down menu
according to the configuration of this equipment.
— FInisher
Not Installed — Select this when no finisher is installed.
Single Position Stapler — Select this when the Single-staple Finisher (only for
e-STUDIO3511, e-STUDIO350, and e-STUDIO280 Series) is installed.
Multi-Position Stapler — Select this when the Multi-staple Finisher or Sad-
dle-stitch Finisher is installed.
Multi-Position Stapler and Hole Punch — Select this when the Multi-staple
Finisher or Saddle-stitch Finisher and Hole Punch unit are installed.
Job Separator — Select this when the Job Separator is installed (only for
e-STUDIO450 Series and e-STUDIO280 Series).