


196 Printing Guide — Installing Client Software for UNIX
For e-STUDIO4511 Series:
cp TOSHIBA_EST4511_CUPS.gz /usr/share/cups/model/
For e-STUDIO450 Series:
cp TOSHIBA_EST450_CUPS.gz /usr/share/cups/model/
For e-STUDIO280 Series:
cp TOSHIBA_EST280_CUPS.gz /usr/share/cups/model/
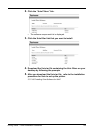
4. Enter the following command:
service lpd stop
• When using the Red Hat Linux, continue to the next step.
• When using other than the Red Hat Linux, skip to step 8.
5. When using the Red Hat Linux, enter the following command:
/usr/bin/redhat-switch-printer
• The redhat-switch-printer dialog box appears.
6. Select “CUPS” and click [OK].
• The information dialog box appears.
7. Click [OK].
8. Enter the following command:
service cups start
9. Enter the following command:
/usr/bin/cupsconfig
• The Common UNIX Printing System page appears.
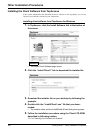
10. Click the “Manage Printers” link.
• The Printer page is displayed.
11. Click [Add Printer].
• The Prompt dialog box appers.
12. Enter the user name and password that has the Super User
privilege, and click [OK].
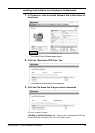
• The Admin page is displayed.
13. Enter the printer name in the “Name” field and click [Con-
tinue].
14. Select “Internet Printing Protocol (http)” at the “Device” drop
down box and click [Continue].
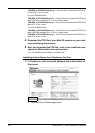
15. Enter the IPP URL address (http://<IP address>:631/Print) for
the equipment in the “Device URL” field and click [Continue].
16. Select “TOSHIBA” at the “Make” drop down box and click
[Continue].