


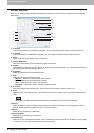


2 PRINTING FROM WINDOWS
52 Setting Up Print Options
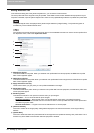
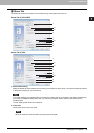
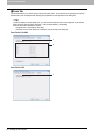
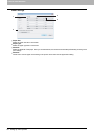
Custom Paper Size
In the Custom Paper Size dialog box, up to 20 custom paper sizes can be defined. The custom page size that you specify
can be selected in the [Original Paper Size] and [Print Paper Size] box on the Basic tab.
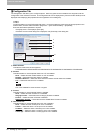
1) Paper Size List
Select the custom paper size that you want to modify.
2) Name
Enter the custom paper size name. You can enter up to 63 characters. This name will be displayed in the [Original
Paper Size] and [Print Paper Size] box on the Basic tab.
3) Paper Size
Enter A (Length) and B (Width) to specify the paper size.
4) Units
Select the unit for the paper size. The default unit varies depending on the regional setting in the Windows.
5) [Add]
Click this to save the settings over the selected custom paper size that you selected in the [Paper Size List].
6) [Delete]
Click this to clear and restore the default settings of the selected custom paper size that you selected in the [Paper
Size List]. When you click this, the confirmation dialog box appears. Click [Yes] to delete the setting.
y To register a custom paper size, either A (Length) or B (Width) should be different more than 0.1inch (2mm) from
the standard paper size. If not, the created custom paper size is considered as the standard paper size.
y You cannot create a custom paper size with A (Length) longer than B (Width). If you want to print such a
document, print the document by selecting [landscape] for the [Orientation].
y There are some precautions when you use paper larger than standard sizes. For the details, see the following
page:
P.82 “Printing on paper larger than standard sizes”
1
2
3
4
56