


7
•
= Setting the standard mode selection parameter will be referred to in this manual
as performing a TYPE X RESET, where X is the parameter setting value.
2.2
2.22.2
2.2
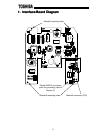
Installation Procedure
Installation ProcedureInstallation Procedure
Installation Procedure
Installation of the TOSHIBA Profibus option ROM and interface board into a
TOSVERT-130 G3 inverter should only be performed by a qualified technician
familiar with the maintenance and operation of the G3. To install the option ROM and
interface board, complete the following steps:
1. Record the option ROM version number located on the label of the option ROM in
the following box. The option ROM version is the number immediately following
the “V” on the ROM label. For example, if the label indicates “V6402”, the option
ROM version is 6402. This version number will be used later in the installation
process. Option ROM version =
.
Record the standard ROM version number prior to option ROM installation. The
standard ROM version can be read from parameter ROM VERSION in
GROUP:UTILITY PARAMETERS.
Standard ROM version =
.
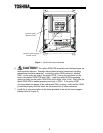
2. CAUTION! Verify that all input power sources to the inverter have
been turned OFF and are locked and tagged out.
3.
DANGER! Wait at least 5 minutes for the inverter’s electrolytic
capacitors to discharge before proceeding to step 4. Do not touch any internal
parts with power applied to the inverter, or for at least 5 minutes after
power to the inverter has been removed. A hazard exists temporarily for
electrical shock even if the source power has been removed.
4.
Remove the inverter’s cover (open the door on units with hinged doors).
Verify that the CHARGE LED has gone out before continuing the installation
process.
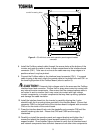
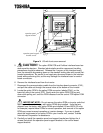
5. Loosen the 4 screws attaching the G3’s operation panel support bracket to the
control board support bracket, and then remove the operation panel and support
bracket as a unit (refer to Figure 1).