55
CONFIGURING UNIVERSAL PLUG AND PLAY (UPnP)
Universal Plug and Play or UPnP is a networking architecture
that provides compatibility among computers, networking
equipment, software and peripherals. With UPnP, connected
devices communicate their features to the network at a times
interval so other devices can access those features.
Follow the steps below to configure UPnP support:
1. Open a browser window and login to the router.
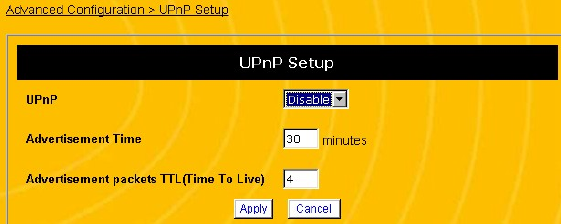
2. Click Advanced Configuration, then UPnP. This displays
the UPnP Setup screen (see Figure 22).
Figure 22 UPnP Setup Screen
3. In the UPnP field, select Enable.
4. In the Advertisement Time field, enter how often you want
the router to transmit its UPnP feature message.
5. In the Advertisement Packets TTL (Time to Live) field,
enter how many connections or devices the packet can
travel through (or hop) before it expires.
56
6. Click Apply. If the router displays a dialogue box that says
“Values are saved. Do you really want to reboot the system
now?” click OK. This will reboot the router and apply all
configuration changes.
NOTE: If the router does not prompt you to reboot it at the
end of the last configuration step, use the reboot
command. See Rebooting the Router on page 77.
CONFIGURING A DMZ
The router allows you to configure a single PC on the LAN to be
forwarded all traffic received on the Firewalls WAN interface. If
you want a PC to receive all Internet traffic unfiltered from the
Internet then they should be configured as the DMZ. Follow the
steps below if you need to configure a PC to operate as a DMZ.
NOTE: Any PC that is configured to operate as the DMZ is
not protected from malicious access by the router.
NOTE: Though a DMZ is set up to receive all traffic
unfiltered by the firewall, traffic is still subject to
translation by NAT. This means that Applications
that are damaged by NAT (i.e. SIP) will still be
affected.
1. Assign a fixed IP address to the PC you want to set up in the
DMZ (see Configuring a Fixed IP Address for a PC on page
45). Record this IP address.
2. Open a browser window and login to the router.
3. Click Advanced Configuration, then DMZ. This displays
the DMZ screen (see Figure 23).


