


59
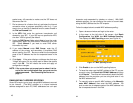
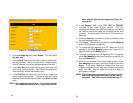
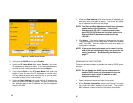
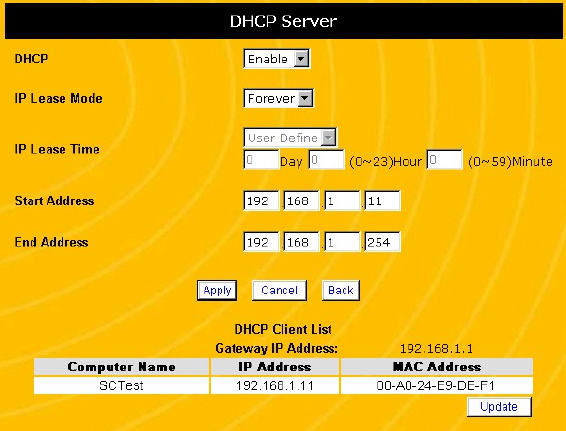
Figure 24 DHCP Server Screen
3. Verify that the DHCP field is set to Enable.
4. Under the IP Lease Mode field, select Forever if you want
IP addresses to always be valid. If you want addresses to
be valid for only a short period of time, select Expire.
5. If you select Expire in the IP Lease Mode field, enter the
length of time you want the IP addresses to remain valid.
You can select a preset value from the list, or you can enter
a number of days, hours, and minutes.
6. Under the Start Address field, enter the first IP address you
want the router to be able to assign. Be sure to enter the
four separate parts of the IP address into the four separate
boxes in the field.
60
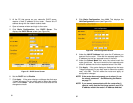
7. Under the End Address field, enter the last IP address you
want the router to be able to assign. The router will assign
any IP address that falls into this range.
NOTE: The Start and End Addresses should be in the same
subnet as the LAN IP address. If the LAN IP
Address were 192.168.1.1 and the subnet mask
were 255.255.255.0 then the first three parts of the
Start and End IP addresses would need to be
192.168.1.
8. Click Apply. If the router displays a dialogue box that says
“Values are saved. Do you really want to reboot the system
now?” click OK. This will reboot the router and apply all
configuration changes.
NOTE: If the router does not prompt you to reboot it at the
end of the last configuration step, you must use the
reboot command. See Rebooting the Router on
page 77.
DISABLING THE DHCP SERVER
Follow the procedure below to disable the router’s DHCP server
function:
NOTE: Do not disable the DHCP server unless there is
another DHCP server on this network or you are
prepared to give a static IP address to each
computer accessing it.
1. Open a browser window and login to the router.
2. At the System Information screen (see Figure 2 on page
24), record the MAC address of the router. The router’s
MAC address is listed under the LAN status information.