


15
INSTALLING THE HARDWARE
4. Connect to the DSL/Cable Modem: Connect one end of
the supplied CAT 5 network cable to the DSL/Cable Modem.
Insert the other end into the ENR1504 port labeled WAN.
5. Connect to the PC’s: Using standard CAT 5 network
cables, connect any one of the four available LAN ports
(labeled 1 through 4) to your PC’s network card or Ethernet
connection (RJ-45 jack).
6. Power on the Router: Plug the power adapter into an AC
power outlet and connect the power supply to the power jack
on the rear of the ENR1504. The power LED should
immediately turn on.
NOTE: The ENR1504 has no “on” switch. It will power on as
soon as the power adapter is connected.
7. Observe the Power-On Self Test: When the ENR1504
powers on, it conducts a series of hardware diagnostics
called Power-On-Self-Test (POST). While the POST is
running, watch the front panel of the router. The Test LED
should stay ON during the POST. If router passes the
POST, the Test LED will turn off. If the Test LED stays on,
then the router has failed the test.
The hardware installation is complete. Continue to Step 2: PC
Configuration on page 16.
16
STEP 2: PC CONFIGURATION
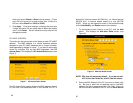
In order for your computer to communicate with the ENR1504,
both devices must be on the same LAN, i.e. the first three parts
of their IP addresses must be the same:
The default IP address of the ENR1504 Router is 192.168.1.1.
As a result, your PC’s IP address must start with 192.168.1 as
well. Fill in the last digit with some number other than 1 to
distinguish your computer from the router.
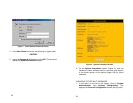
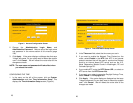
To verify and/or change your PC’s IP address so it is on the
same network, please see the instructions specifically for your
Microsoft operating system: Windows 95, 98, ME, NT, 2000 or
XP.
NOTES:
- If you are using the default ENR1504 settings and
the default Windows “Obtain an IP address
automatically” (DHCP) settings, no changes are
required.
- By default, the 10/100 Router will act as a DHCP
Server, automatically providing an IP Address and
other related information to each PC on the LAN
when that PC boots up.
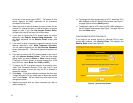
- If you receive a Static (Fixed) IP address from your
Cable/DSL provider, write it down along with your
DNS Server information when prompted through the
steps below. You will need to enter the Static IP
address later during the IP Sharing Section of the
Owner’s Manual.