


Xerox Nuvera Paper Guide
E-2
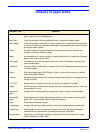
Managing the Stock Library
To delete a specified stock from the Stock Library:
1. Select the Stock Library tab in Printer Manager.
2. Select the stock to be deleted. The table row is highlighted.
3. Select [Stock: Delete]. A confirmation window opens.
4. To delete the stock from the Stock Library, select [Delete].
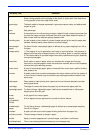
Edit stock attributes
To display stock attributes for a specified stock, select the Stock
Library tab in Printer Manager and double click on the stock. A
window opens and the stock attributes can be modified by an
Administrator.
CAUTION: An incorrect value for any stock or media attribute
can cause faults or unacceptable image quality.
NOTE: If the specified stock is being used for the current job, the
stock attributes cannot be edited.
If the specified stock is assigned to a tray, the stock attributes
cannot be edited. Program the tray for a different stock before
continuing with the procedure.
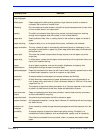
1. Select the Stock Library tab.
2. Select the stock to be edited. The table row is highlighted.
3. Double click the row to open a settings window.
4. Select the attribute to be modified.
KEY POINT: Stock Name is not case sensitive and must be
unique.
5. Select the desired value for the attribute from the menu or type
a new value in the field.
6. Repeat steps 4 and 5 for each attribute to be modified.
7. To add or modify comments, type the desired text in the
Comments field. These comments will be displayed on the
settings window for this stock only.
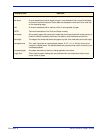
8. To make the changes without closing the settings window,
select [Apply]. Otherwise, select [Save] to apply the changes
and close the window.