


7Faxing
Xerox PE220 7-27
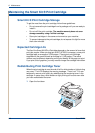
Using Advanced Fax Settings
Your machine has various user-selectable setting options for sending or
receiving faxes. These options are preset at the factory, but you may need to
change them. To find out how the options are currently set, print the System
Data list. For details about printing the list, see above.
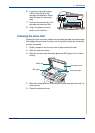
Changing Setting Options
1. Press Menu until “Advanced Fax” appears on the top line of the display.
2. Press the scroll button ( or ) until you see the menu item you want on
the bottom line and press Enter.
3. When the option you want appears on the display, choose a status by
pressing the scroll button ( or ) or enter a value using the number
keypad.
4. Press Enter to save the selection.
5. You can exit from Setup mode at any time by pressing Stop/Clear.
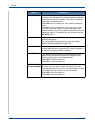
Advanced Fax Setting Options
Option Description
Send Forward
You can set the machine to send a copy of all outgoing faxes
to a specified destination, in addition to the fax numbers you
entered.
Select Off to turn this feature off.
Select On to turn this feature on. You can set the number of
the fax machine to which faxes are to be sent.
RCV Forward
You can set your machine to forward incoming faxes to
another fax number during a specified time period. When a
fax arrives at your machine, it is stored in memory. Then, the
machine dials the fax number that you have specified and
sends the fax.
Select Off to turn this feature off.
Select On to turn this feature on. You can set the fax number
to which faxes are forwarded. Then, you can enter the
starting time and date, and/or the ending time and date. The
Local Copy option allows you to set the machine to print the
fax on your machine, if fax forwarding is completed without
any error.