


Chapter 10 Quality of Service (QoS)
ADSL Series User’s Guide
167
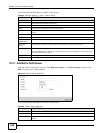
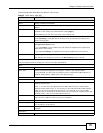
The following table describes the labels in this screen.
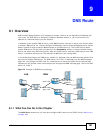
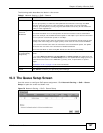
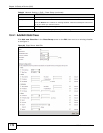
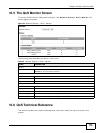
10.3 The Queue Setup Screen
Use this screen to configure QoS queue assignment. Click Network Setting > QoS > Queue
Setup to open the screen as shown next.
Figure 79 Network Setting > QoS > Queue Setup
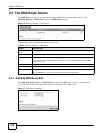
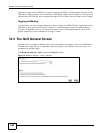
Table 41 Network Setting > QoS > General
LABEL DESCRIPTION
Active QoS Select the check box to turn on QoS to improve your network performance.
You can give priority to traffic that the ZyXEL Device forwards out through the WAN
interface. Give high priority to voice and video to make them run more smoothly.
Similarly, give low priority to many large file downloads so that they do not reduce the
quality of other applications.
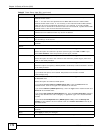
WAN Managed
Upstream
Bandwidth
Enter the amount of bandwidth for the WAN interface that you want to allocate using QoS.
The recommendation is to set this speed to match the interface’s actual transmission
speed. For example, set the WAN interface speed to 1200 kbps if your Internet connection
has an upstream transmission speed of 100 Mbps.
Setting this number higher than the interface’s actual transmission speed will stop lower
priority traffic from being sent if higher priority traffic uses all of the actual bandwidth.
If you set this number lower than the interface’s actual transmission speed, the ZyXEL
Device will not use some of the interface’s available bandwidth.
Leave this field blank to have the ZyXEL Device set this value automatically.
Traffic priority will
be automatically
assigned by
This field is ignored if upstream traffic matches a class you configured in the Class Setup
screen.
If you select Ethernet Priority, IP Precedence or Packet Length and traffic does not
match a class configured in the Class Setup screen, the ZyXEL Device assigns priority to
unmatched traffic based on the IEEE 802.1p priority level, IP precedence or packet
length.
See Section 10.6.1 on page 174 for more information.
Apply Click Apply to save your changes.
Cancel Click Cancel to restore your previously saved settings.