


Installing and Connecting the NIC
15
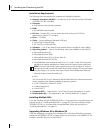
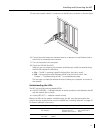
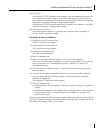
5 Insert the network cable SC connector into the NIC port, as shown in the next figure.
6 Connect the other end of the network cable to a 100BASE-FX Fast Ethernet hub or
switch that is connected to the network.
7 Turn on the power to the computer.
8 Check the 100 LNK (link) LED.
After you turn on power to the computer and before you install the network driver,
the link LED indicates the following:
■ On — The NIC is receiving a good link signal from the hub or switch.
■ Off — No connection exists between the NIC and the hub or switch. See
Chapter 7, “Troubleshooting the NIC,” for troubleshooting help.
The next step is to load the network driver that allows your computer to connect to
the network.
Understanding the LEDs
The NIC has two light-emitting diodes (LEDs):
■ Link LED (100 LNK) — Indicates whether an active connection exists between the NIC
and the network hub or switch.
■ Activity LED (ACT) — Indicates network activity.
Before the LEDs can be used for troubleshooting, the NIC must be connected to the
network and the network driver must be installed (see “Installing Software” on page 16
for driver installation instructions).
LED Description Flashing Steady Off
100 LNK Green:
Link integrity
N/A Good 100BASE-FX link
between NIC and
network hub or switch
No link between NIC
and network hub or
switch
ACT LNK Yellow:
Port traffic
Network traffic
present
Heavy network traffic No traffic
TX D
A
TA
AC
T
100
L
N
K