


Preconfiguring a Switch in 3WXM 341
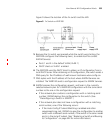
14 Click Finish to save the switch configuration and close the wizard.
Leave 3WXM Services running, with the network plan open. When the
switch is powered on at the remote site (and the Fn switch is pressed, if a
WXR100), the switch contacts 3WXM Services to request a configuration.
Uploading a Partially
Configured Switch
and Completing its
Configuration with
3WXM
Even if you do not know the serial number of a WX switch, you still can
configure the switch in 3WXM. When the switch contacts 3WXM for a
configuration, 3WXM generates a warning message such as the
following:
No Matching configuration found for serial number –
serial-number; IP=ip-addr
You can upload the switch into 3WXM, complete its configuration, then
deploy the complete configuration back to the switch.
1 Select the Verification option on the 3WXM tool bar.
2 Click on the warning message.
3 In the Resolutions section, click on Upload WX to display the Upload WX
wizard.
4 The IP address is already filled in.
5 Type the Enable password, if one is configured on the switch. If an Enable
password has not been configured yet, leave the Enable Password box
blank.
6 Click Finish.
3WXM uploads the configuration file from the switch into the network
plan. The switch appears in the Equipment section of the Organizer
panel.
7 Select the Configuration tab on the 3WXM tool bar.
8 Select the WX switch.
9 Create or modify parameter settings for the switch.
After you complete all the changes, make sure you save the changes by
clicking Save.
10 Select the Verification option on the 3WXM tool bar.
11 Review any error or warning messages for the switch.
12 Click on an error or warning message to display more information, and a
list of resolutions for the error or warning condition.