


Distributing System Images 355
Distributing System
Images
You can distribute a system image to one or more WX switches in a
network plan.
To use a new system image, you must reboot the WX. For more
information, see “Rebooting WX Switches or MAP Access Points” on
page 356.
3Com recommends that you use the Verification tab to resolve any
configuration errors or warnings before you distribute system images.
Before you can distribute an image, you must add it to the image
repository. (See “Using the Image Repository” on page 354.)
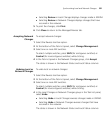
To immediately install an image on WX switches
1 Select the Devices tool bar option.
2 At the bottom of the Task List panel, select Device Operations.
3 In the Managed Devices list, select the WX switches onto which you want
to install the image.
To select more than one WX, click Shift while clicking to select
contiguous items, or click Ctrl while clicking to select noncontiguous
items.
4 In the Task List panel, select Image Install.
5 Click on Select an Image to display the list of images in the repository.
6 Select the image and click Install.
To schedule installation of an image on WX switches
1 Select the Devices tool bar option.
2 At the bottom of the Task List panel, select Device Operations.
3 In the Managed Devices list, select the WX switches onto which you want
to install the image.
To select more than one WX, click Shift while clicking to select
contiguous items, or click Ctrl while clicking to select noncontiguous
items.
4 In the Task List panel, select Schedule Install.
5 Click on Select an Image to display the list of images in the repository.
6 Click Next.