


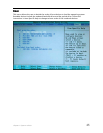
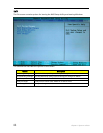


Chapter 3: Replacing notebook components
53
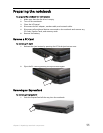
Preparing your work space
Before performing maintenance on the notebook, make sure that your work space and the
notebook are correctly prepared.
❑ Wear a grounding (ESD) wrist strap, and use a grounded or dissipative work mat.
❑ Use a stable and strong table, and make sure that the table top is large enough to
hold each component as you remove it.
❑ Use bright lighting to make part identification easier.
❑ Keep your work surface free from clutter and dust that may damage components.
❑ Use a magnetized screwdriver for removing screws.
❑ When removing components that are attached to the notebook by a cable, unplug
the cable before removing the screws, when possible, to avoid damaging the cable.
❑ As you remove components and screws, lay them toward the rear of your work
surface (behind the notebook) or far enough to the side that your arms do not
accidentally brush them onto the floor.
❑ To help keep track of screws, try the following:
❑ Place each component’s screws in their own section of a parts sorter.
❑ Place each component’s screws next to the component on your work surface.
❑ Print the first page of each task, then place the page toward the rear of your
work surface. As you remove screws, place the screws in their respective boxes
on the page.
❑ After loosening screws that are deeply recessed in a hole (for example, on the
bottom of the base assembly), you can leave the screws in the holes if you
place small pieces of masking tape over the hole openings. When reassembling
the component, just remove the tape and tighten the screws.
❑ When you place flat-headed screws on your work surface, stand them on their
heads to prevent the screws from rolling off the table.