Rackmount MX410/MX412 System Manual
4-2 PRELIMINARY 61189500L1-1B
RACKMOUNT
For a rackmount installation, perform the following steps:
1. Ensure the mounting brackets to the MX410/MX412 are attached using the two screws
provided for each bracket.
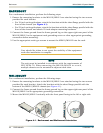
• For 19-inch rack applications, attach the brackets with the short flange parallel with the
front of the chassis (see Figure 4-1).
• For 23-inch rack applications, attach the brackets with the short flange parallel with the
front of the chassis and obtain 23-inch adapter mounting hardware.
2. Connect the frame ground from the frame ground lug on the upper right rear panel of the
MX410/MX412 to the equipment rack grounding screw or other appropriate grounding
connection before mounting.
3. Use the appropriate rack type screws to mount the MX410/MX412 into the rack.
CAUTION
Care should be taken to not upset the stability of the equipment
rack after installation is complete.
NOTE
The unit must be installed in accordance with the requirements of
NEC NFPA 70. When mounting the MX410/MX412 in a rack,
multiple chassis can be mounted in adjacent rack slots.
WALLMOUNT
For a wallmount installation, perform the following steps:
1. Ensure the mounting brackets to the MX410/MX412 are attached using the two screws
provided for each bracket. Attach the brackets with the short flange parallel with the
bottom of the MX410/MX412 chassis (see Figure 4-1).
2. Connect the frame ground from the frame ground lug on the upper right rear panel of the
MX410/MX412 to an appropriate grounding connection.
3. Mount the MX410/MX412 vertically with the front panel facing to the left or right side.
Figure 4-1. Rackmount and Wallmount Orientation


