


Chapter 6: Managing the Switch
72
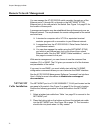
Remote Network Management
You can manage the AT-DC2552XS switch remotely through any of the
Ethernet ports (1 through 64) or through or the NET MGMT (ETH0)
Ethernet port on the rear panel of the switch. See Figure 2 on page 20 for
the location of these ports.
A management session may be established through these ports over an
Ethernet network. The requirements for remote management of the switch
are listed here:
A terminal or computer with a VT100 or equivalent terminal
emulator program with a connection to your Ethernet network.
A connection from the AT-DC2552XS L2 Data Center Switch to
your Ethernet network.
You can also manage the switch using the NET MGMT (ETH0)
port which is an Ethernet port, but is out-of-band from normal
Ethernet traffic. See the “NET MGMT Cable Installation,” next on
this page to connect to this port.
With remote management, you can choose to use the command line
interface (CLI) or SNMP. The CLI gives you access to all of the features
and parameters of the switch.
If you want to use SNMP, you must initially start with the CLI SNMP
configuration commands where you can customize the SNMP interface.
See the AT-DC2552XS Management Software Command Line Interface
User’s Guide for more information at alliedtelesis.com/support/
documentation.
NET MGMT
Cable Installation
The NET MGMT port is a 10/100/1000BASE-T, RJ-45 port located on the
rear panel of the switch. See Figure 2 on page 20 for this port’s location.
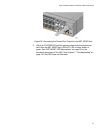
Perform the following procedure to install the cable in the NET MGMT
port.
1. Select a twisted pair cable from Table 1 on page 22 to connect to the
NET MGMT port.
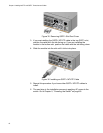
2. Place the locking tab on the bottom and insert the twisted-pair cable
into the NET MGMT port. See Figure 38 on page 73. The connector
should click into place when it is fully seated.