


22
PROGRAMMING
VSI-Pro Max POS / Cash Register Interface
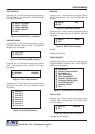
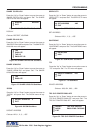
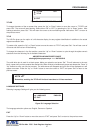
Figure 39: NORAND 1200 Sub-Menu
TITLE DISPLAY : ON
CONSOLE ID : ANY
WORKING MODE :
EXIT
TITLE DISPLAY
Choices: ON, OFF
CONSOLE ID :
Choices: ANY, 1, 2, 3, 4, 5, 6, 7, 8
WORKING MODE
Choices: ACK , TAP
NORAND 1200
Press the “Up” or “Down” button to move the cursor to
“NORAND 1200” and press “Set”. The NORAND 1200
menu will appear:
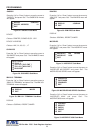
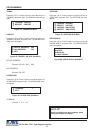
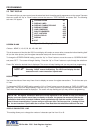
NUCLEUS PRINTER
Press the “Up” or “Down” button to move the cursor to
“NUCLEUS PRINTER” and press “Set”. The NUCLEUS
PRINTER” menu will appear:
Figure 40 : NUCLEUS PRINTER Sub-Menu
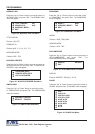
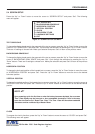
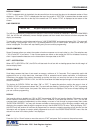
Figure 42: PANASONIC Sub-Menu
MODEL : 6000
WORKING MODE : TAP
EXIT
MODEL
Choices : 6000, 7000, 8000
WOKING MODE
Choices : ACK , TAP
PANASONIC
Press the “Up” or “Down” button to move the cursor
to “PANASONIC” and press “Set”. The PANASONIC
menu will appear:
JOURNAL PRINTER
RECEIPT PRINTER
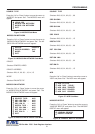
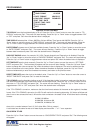
Figure 41: OMEGA 2000 Sub-Menu
OMEGA 2000
Press the “Up” or “Down” button to move the cursor
to “OMEGA 2000” and press “Set”. The OMEGA 2000
menu will appear:
DISPLAY RECEIPT
EXIT
Figure 43: SCHLUMBERGER Sub-Menu
DISPLAY
Choices: RECEIPT, CDU[ 2L ], C.D.U.
SCHLUMERGER
Press the “Up” or “Down” button to move the cursor to
“SCHLUMBERGER” and press “Set”. The
SCHLUMBERGER menu will appear:
Figure 44: SHARP Sub-Menu
2590
3100,3110
3220,3221,3250
3310,3311,3550
A-460,A-470
A-550,A-570
A-610,A650
A-750
A-770
SHARP
Press the “Up” or “Down” button to move the cursor to
“SHARP” and press “Set”. The SHARP menu will appear.
STANDARD [Both]
PRINTER WITH POLE
POLE VIA PRINTER