


69
APPENDIX J RS-232 to RS-422/RS-485 Converter
VSI-Pro Max POS / Cash Register Interface
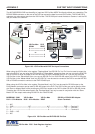
For some installations exceptional long runs are required, then RS-232 can not support for is
normally limited to about 100 ft. In this case one would convert the RS-232 to RS-485 which can
be extended up to about 3000 ft. Then on the other end another converter would convert back to
RS-232. When using the VSI-Pro Max this additional converter is not required for already has built
in RS-485 compatibility. However termination for the POS / Cash Register port is via JP2 internally
to the VSI-Pro Max is required.
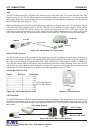
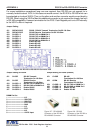
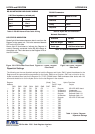
Jumper Setting
JP1 OPEN/CLOSE RS485 / RS-422 Transmit Termination On/Off 120 Ohm
JP2 OPEN/CLOSE RS-422 Receive Termination On/Off 120 Ohm
JP4 CLOSE 1-2 RS-232 TXD to DB9M Pin 3
JP4 CLOSE 2-3 RS-232 TXD to DB9M Pin 2
JP5 CLOSE 1-2 RS-232 RXD to DB9M Pin 2
JP5 CLOSE 2-3 RS-232 RXD to DB9M Pin 3
JP6 CLOSE 1-2 Enable RS-485
JP6 CLOSE 2-3 Enable RS-422
JP7 CLOSE 1-2 Enable RS-485
JP7 CLOSE 2-3 Enable RS-422
Jumper Setting for RS422
JP1 CLOSE RS-422 Transmit
Termination On 120 Ohm
JP2 CLOSE RS-422 Receive
Termination On 120 Ohm
JP4 CLOSE 1-2 RS-232 TXD to DB9M Pin 3
JP5 CLOSE 1-2 RS-232 RXD to DB9M Pin 2
JP6 CLOSE 2-3 Enable RS485
JP7 CLOSE 2-3 Enable RS485
Jumper Setting for RS485 (Default )
JP1 CLOSE RS-485
Termination On 120 Ohm
JP2 OPEN RS-422 Receive
Termination Off 120 Ohm
JP4 CLOSE 1-2 RS-232 TXD to DB9M Pin 3
JP5 CLOSE 1-2 RS-232 RXD to DB9M Pin 2
JP6 CLOSE 1-2 Enable RS-485
JP7 CLOSE 1-2 Enable RS-485
DB9M Pin Out
1 —————————— N/C
2 —————————— RXD/TXD
3 —————————— RXD/TXD
4 —————————— DTR True
5 —————————— GND
6 —————————— N/C
7 —————————— RTS
8 —————————— N/C
9 —————————— 12VDC Input
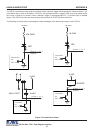
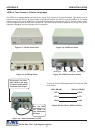
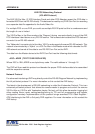
Figure 128: RS-232
Connector of the RS-232 to
RS-422/485 Converter.
Figure 127: RS-422/485
Connector of the RS-232 to
RS-422/485 Converter.
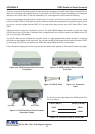
Figure 126: RS-232 to RS-485/422 Converter PCB