


36
DEST ID and SRC ID
Choices: 1 through 32 Note:The DEST ID and SRC ID can not be the same value or can not send any command.
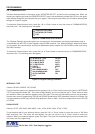
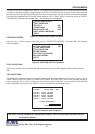
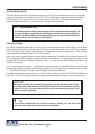
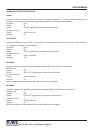
Figure 69: DVR-3011,3021,MVDR3000,MVDR5000 Sub-Menu
DVR-3011 / DVR-3021 / MVDR3000 / MVDR5000
Press the “Up” or “Down” button to move the cursor to “DVR-3011,3021” and press “Set”. An asterisk appears to
indicate your selection.
DEST ID 1
SCR ID 32
EXIT
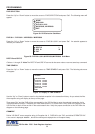
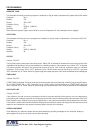
TIME SEARCH
Press the “Up” or “Down” button to move the cursor to “TIME SEARCH” and press “Set”. The following sub-menu
will appear:
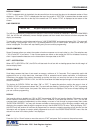
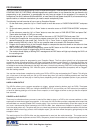
DVR SELECTION
Press the “Up” or “Down” button to move the cursor to “DVR SELECTION” and press “Set”. The following menu will
appear:
PROGRAMMING
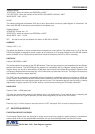
VSI-Pro Max POS / Cash Register Interface
Use the “Up” or “Down” button to scroll to the desired exception in the transaction history. As you select the lline
the exception string will display at the top of the page.
Then press “Set” and the DVR will be commanded by the VSI-Pro Max to go to the selected transaction via its
Time/Date Search function. Therefore you must make sure the T/D of the DVR is very close to the setting of the
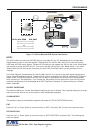
VSI-Pro Max or their will be an effor in the actual search time. Verify the proper connection to the DVR from the
diagram on the following page.
EXAMPLE
Define “NO SALE” as an exception string In Exception No. 2 , DISPLAY to be “ON”, and define OPERATOR “IN”.
If the screen is displayed “NOSELL”, the VSI-Pro will keep this displayed line on Exception History.
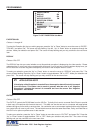
Figure 68: DVR Selection Sub-Menu
NONE
DMS-3001
DVR-3011,3021
MVDR3000, MVDR5000
EXIT
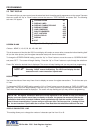
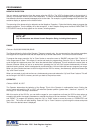
NO SALE
PREVIOUS PAGE
11:20:23 A 9/12/08
11:22:21 A 9/12/08
11:22:21 A 9/12/08
11:22:21 A 9/12/08
11:22:21 A 9/12/08
NEXT PAGE
EXIT
Figure 70: Display of TIME SEARCH