


Configuring Communications
31
MVP-7500/8400 Modero Viewpoint Wireless Touch Panels
Configuring multiple wireless Moderos to communicate to a target WAP200G
1.
For each communicating touch panel, complete all of the steps outlined within the previous
Configuring the Modero’s wireless card for secured access to a WAP200G section on page 27.
2. Navigate back to the Wireless Settings page on each panel.
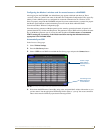
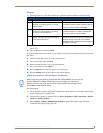
3. Verify that all communicating Modero panels are using the same SSID, encryption level, Default
Key #, and an identical Current Key value.
As an example, all panels should be set to Default Key #1 and be using aa:bb:cc..as the
Current Key string value. This same Key value and Current Key string should be used on the
target WAP.
4. Repeat steps 1 - 3 on each panel. Using the same passphrase, generates the same key for all
communicating Modero panels.
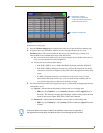
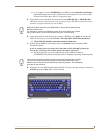
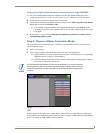
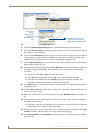
Step 3: Choose a Master Connection Mode
The panel requires you establish the type of connection you want made between it and your master.
In the Protected Setup page:
1. Select System Settings.
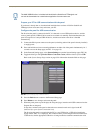
2. Select Type to toggle between the Master Connection Types USB and Ethernet.
A USB connection is a direct connection from the panel’s mini-USB port to a corresponding
USB port on the PC (acting as a Virtual Master).
A Wireless Ethernet connection involves indirect communication from the panel to a Master
via a wireless connection to the network.
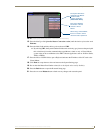
USB
NetLinx Studio can be setup to run a Virtual Master where the PC acts as the Master by supplying its
own IP Address for communication to the panel. For a PC to establish a USB connection with a Modero
panel, it must have the AMX USBLAN driver installed.
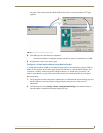
It is recommended that firmware KIT files only be transferred over a direct connection
and only when the panel is connected to a power supply. If battery power or wireless
connection fails during a firmware upgrade, the panel flash file system may become
corrupted.
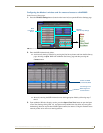
FIG. 25 System Settings page