


Doing a normal installation
Follow the steps in this section to do what is commonly called a “normal”
installation of system software.
If you’re installing system software on a hard disk for the first time, make sure
that your hard disk has been initialized, a process that prepares the disk to
store information. (You initialize a disk using the Drive Setup program on
your hard disk.)
To do a normal installation, follow these steps:
1 Start up your computer from the
Disk Tools
disk.
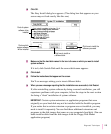
2 Find and open the Disk First Aid icon.
After Disk First Aid starts, follow the instructions on the screen. Disk First
Aid checks your hard disk for any problems.
3 When Disk First Aid has finished checking your hard disk, choose Quit from the
File menu.
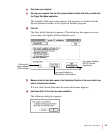
4 Open the Drive Setup program.
You use the Drive Setup program to update your hard disk.
5 In the list of drives, click your startup disk.
6 Pull down the Functions menu and choose Update Driver.
7 When the update process is finished, quit Drive Setup.
8 Shut down your computer.
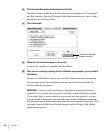
9 Start up your computer from the first system software installer disk you made with
Floppy Disk Maker.
The Installer’s Welcome screen appears. You may have to double-click the
System Software Installer icon to open the Installer program.
112
Chapter 8