


12
ETHERNET PRINT SERVER
3. Installation
This chapter covers only the installation of the EPS in the network and
attaching the print devices. For details on installing the optional RTEL
software or installing a new download image (to re-load the EPS’s code
in the Flash-ROMs) see Appendix E.
This section assumes a basic understanding of network installations,
and host setup in NetWare, TCP/IP, AppleTalk, or LAT environments.
We strongly recommend reading this entire section completely before
starting the installation.
1. Unpack the EPS, and check for any damage or abnormal wear.
2. Pick a location for the server. Keep in mind the cabling restrictions
discussed in Appendix A.
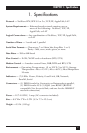
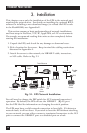
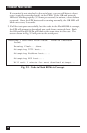
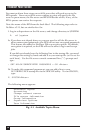
3. Attach the server to the network, via 10BASE-T cable, transceiver,
or AUI cable. Refer to Fig. 3-1.
Fig. 3-1. EPS Network Installation.
You will need to change the DIP switch for AUI (external transceiver)
operation. By default, the EPS will use the 10BASE-T (RJ-45) port.
See the EPS label for information on changing the switch position.
The EPS must have a valid network connection to boot fully. If it detects a
network fault, it will not boot. If you wish to boot the EPS without attaching
to your network, you can either connect a terminated transceiver to the AUI
port or connect the 10BASE-T port to a disabled port on a hub.
Parallel Laser
Printer
Serial
Printer
Macintosh
NetWare
File
Server
Sun
MicroVAX™
Serial
Printer
EPS
ThinNet
Hub
Parallel Printer
EPS
10BASE-T
Hub
EPS
Thick Ethernet